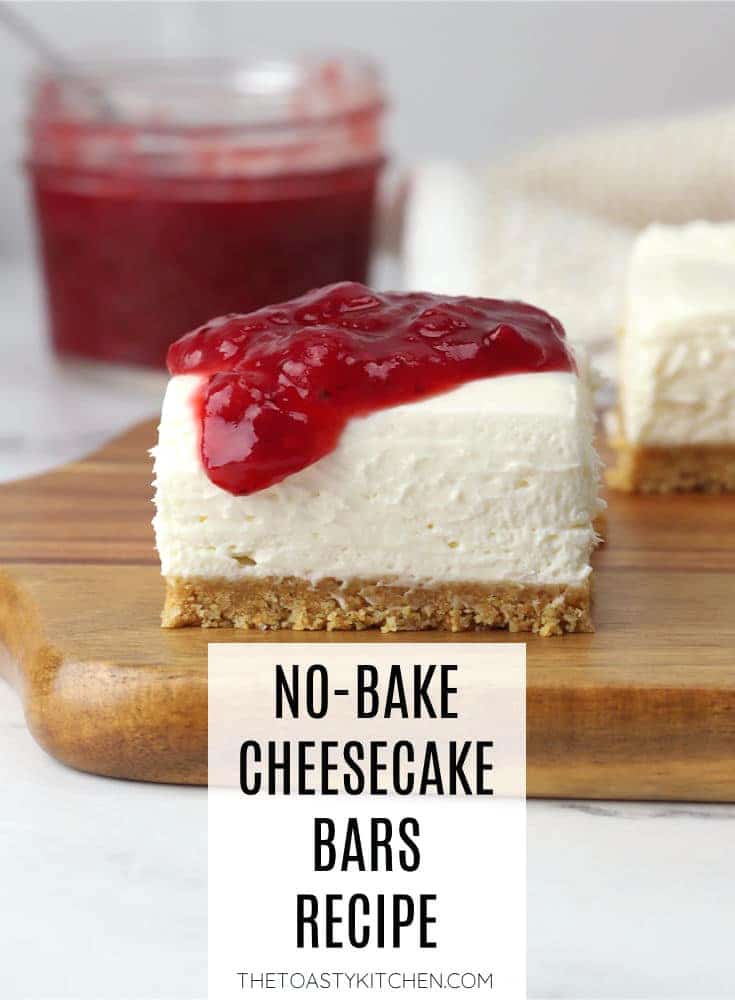
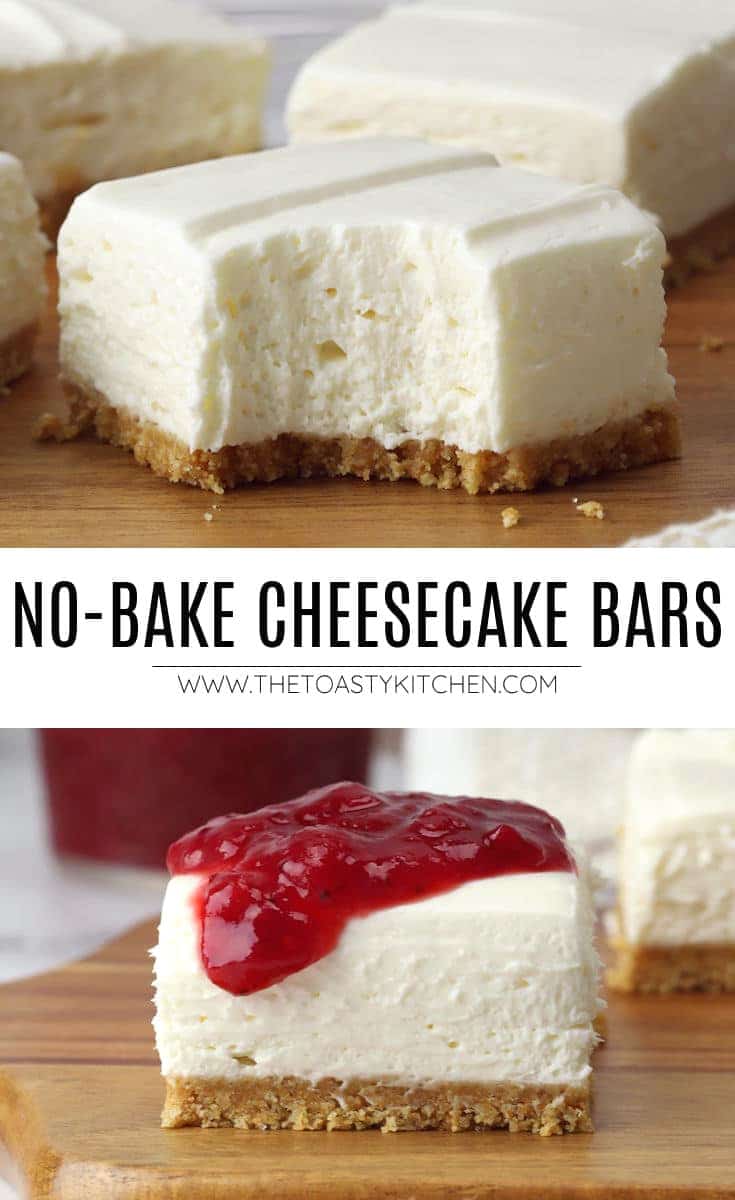
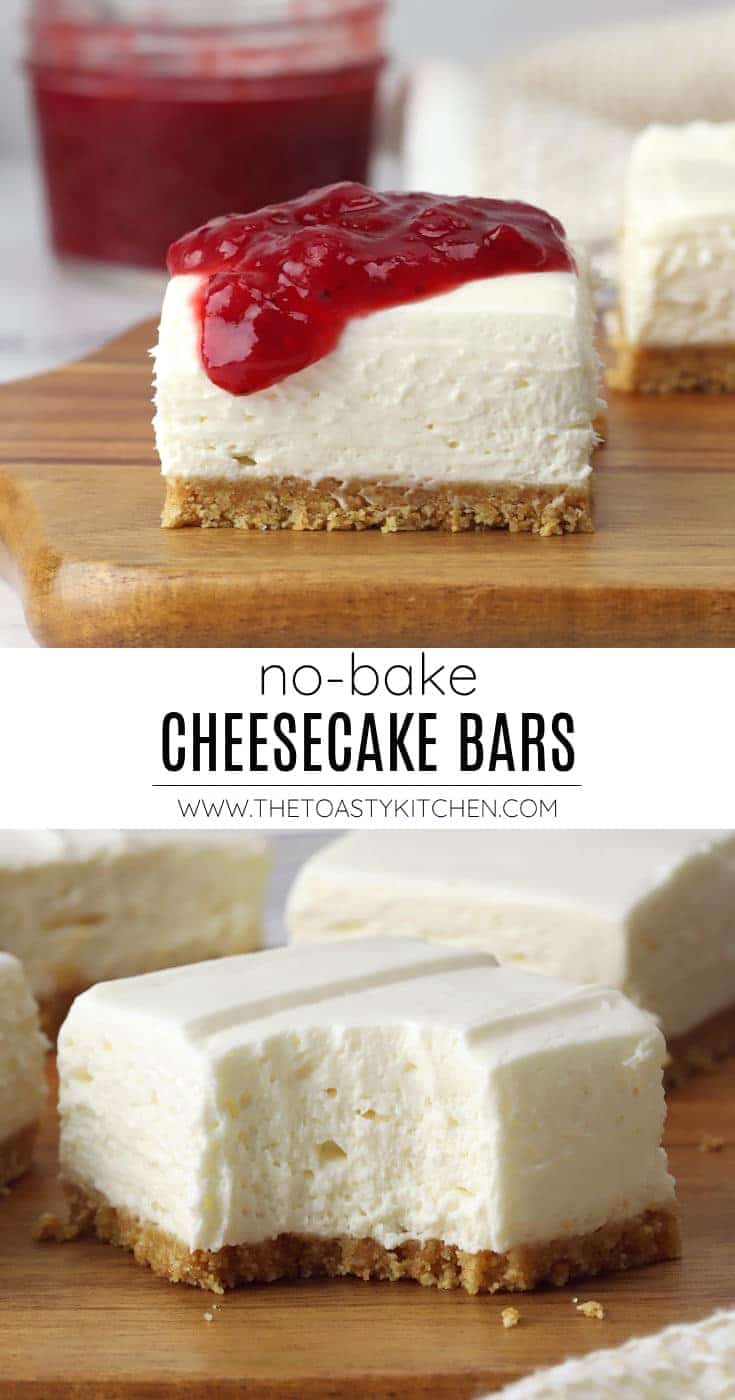
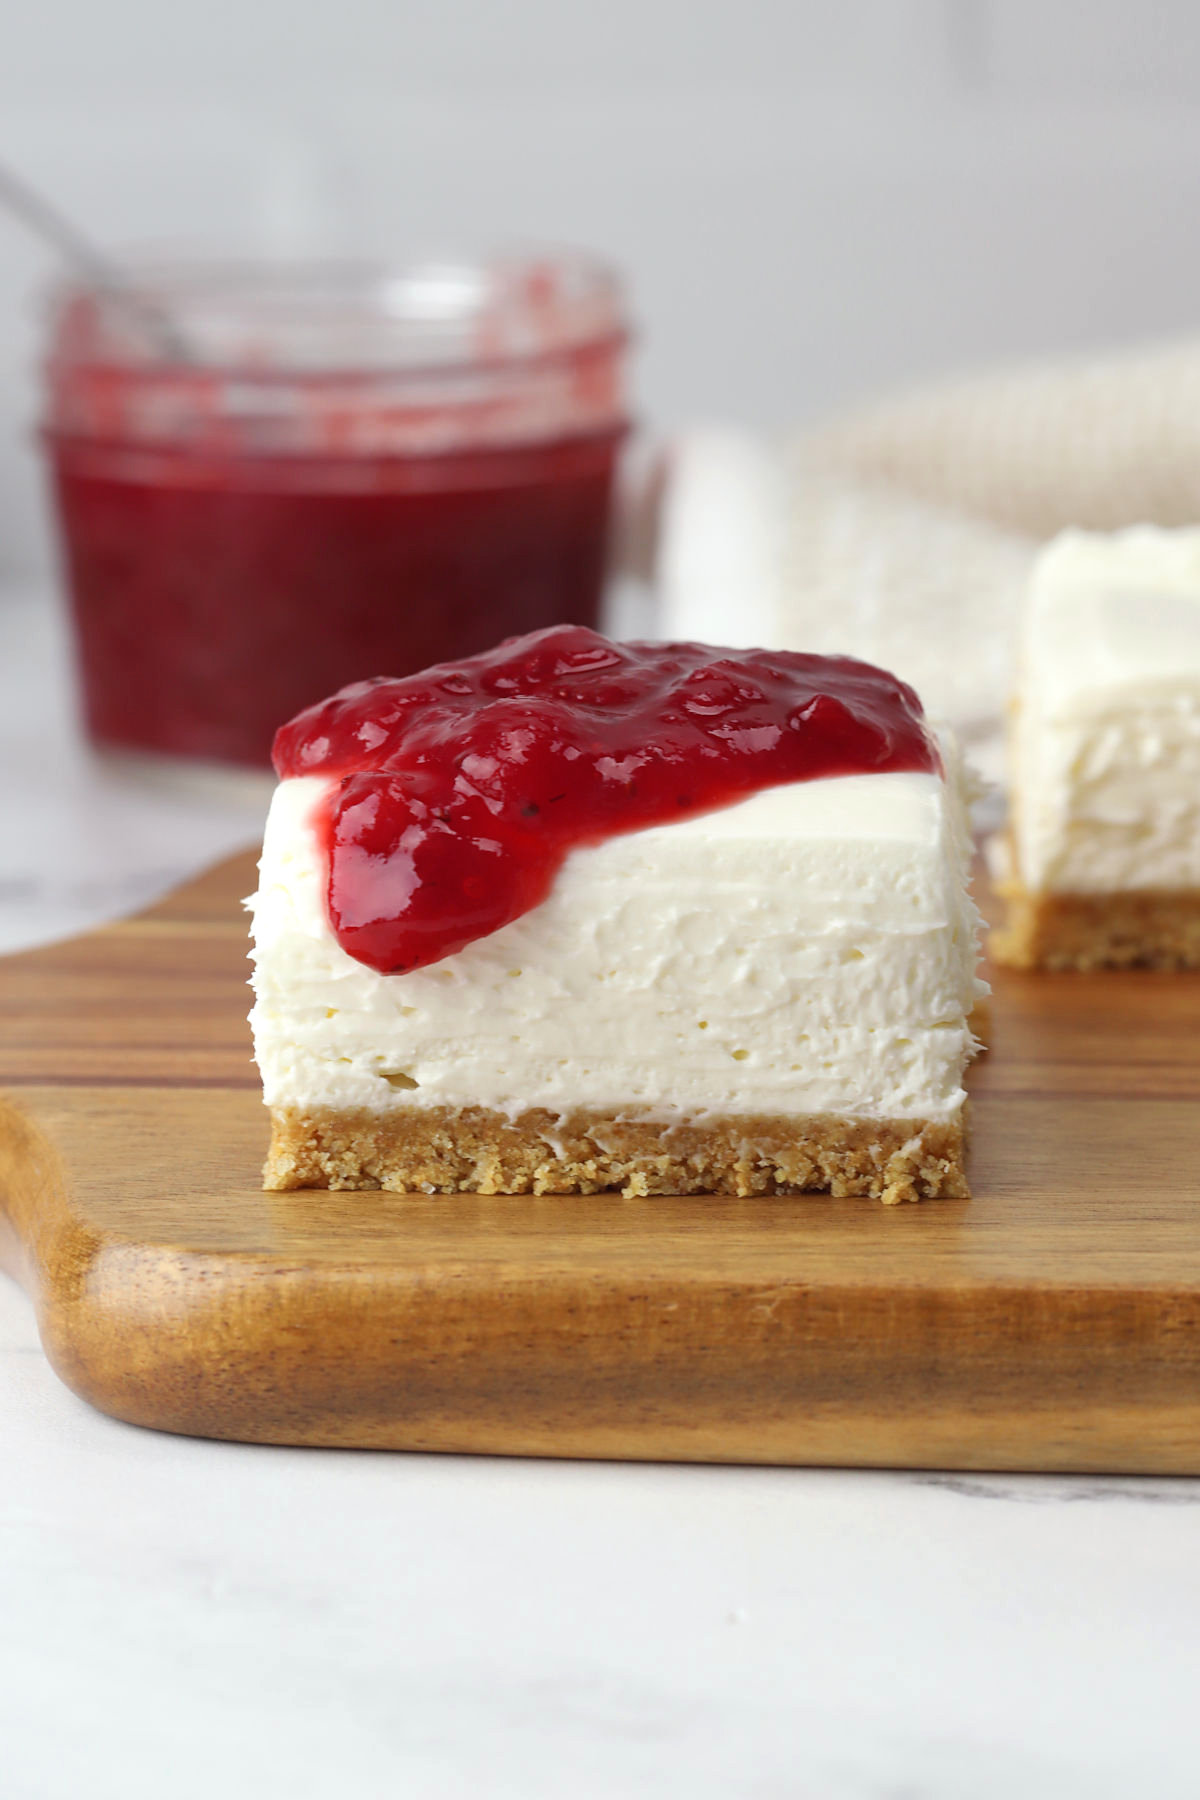
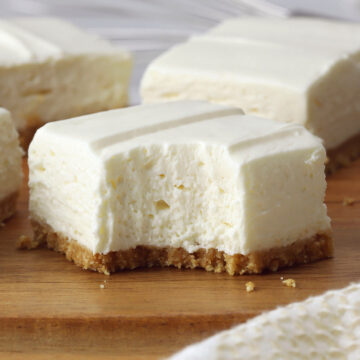
No-bake cheesecake bars are a crowd-pleasing dessert to make for your next party or summer picnic. Made with a graham cracker crust and dreamy filling that's light and sweet, like a cheesecake mousse.
Recipe summary
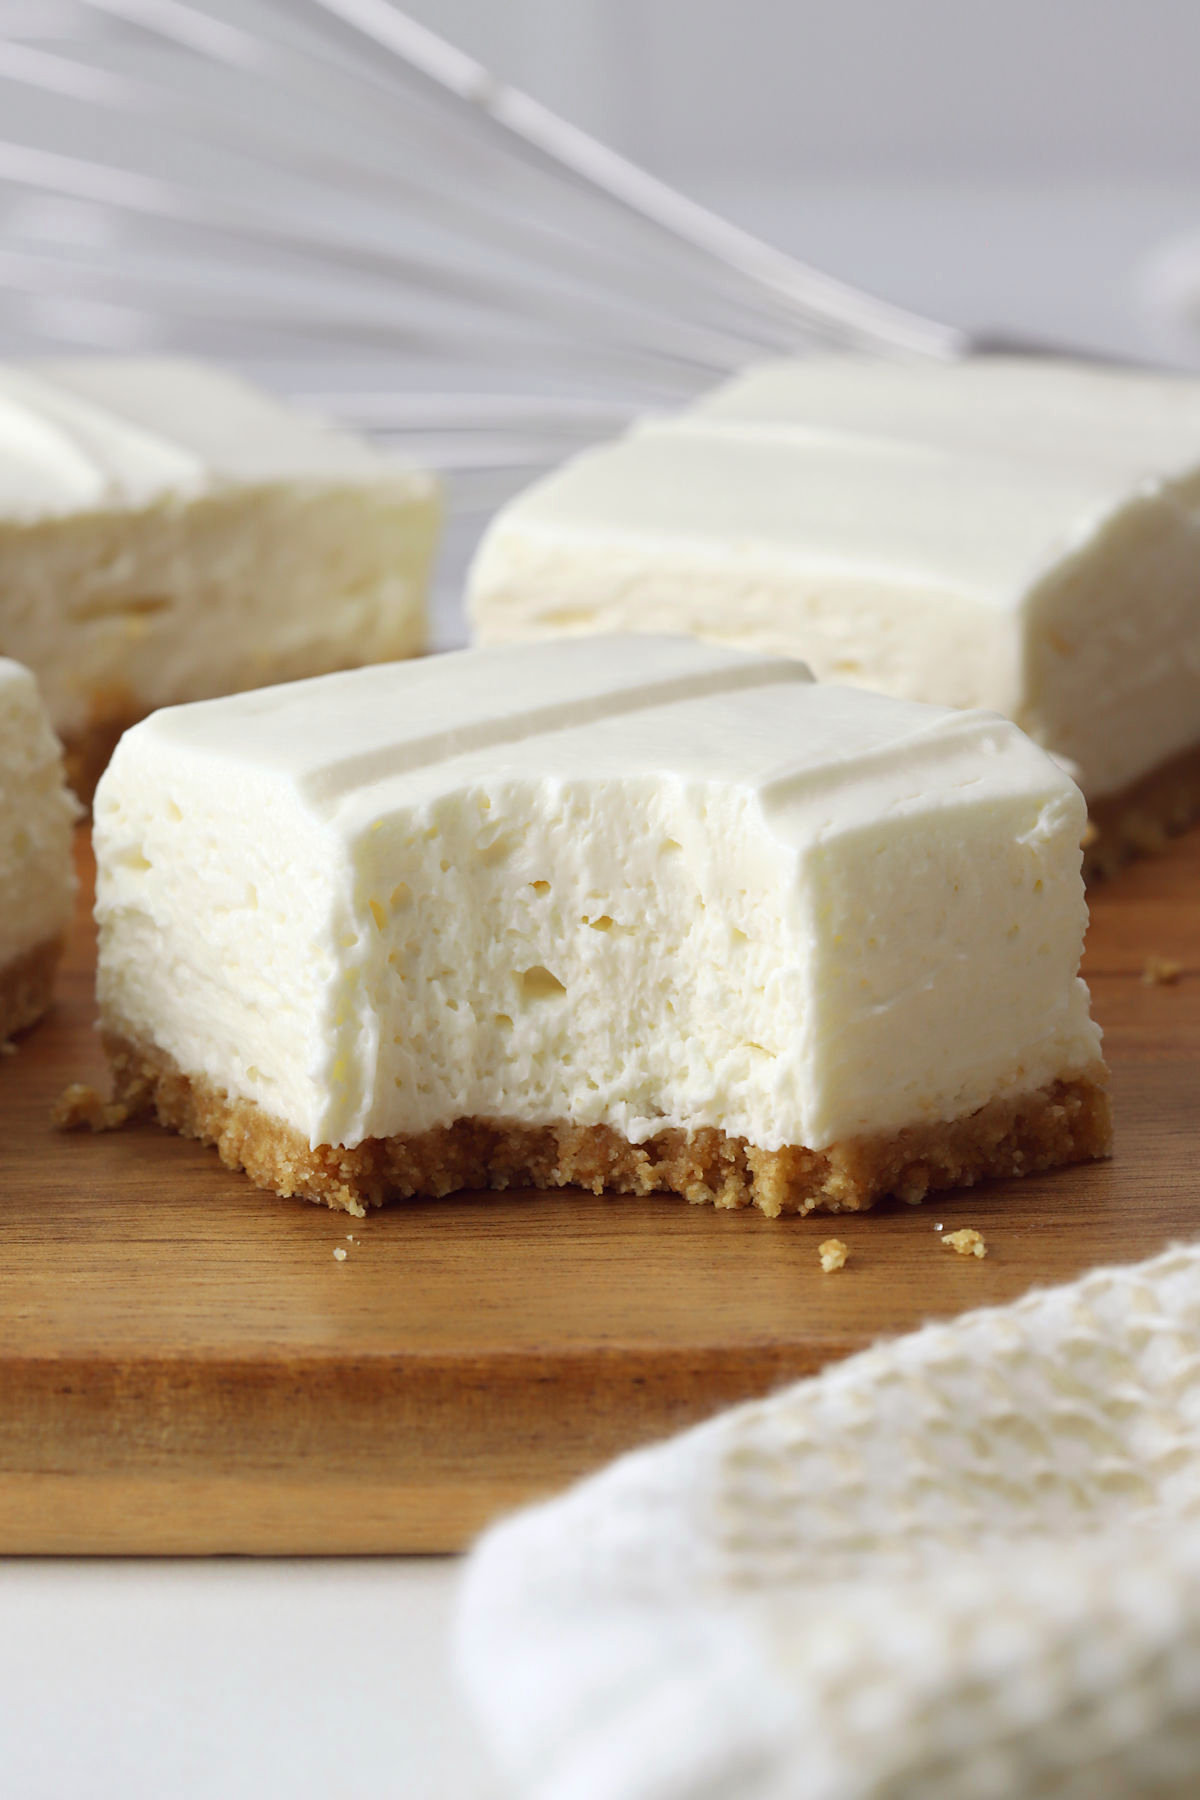
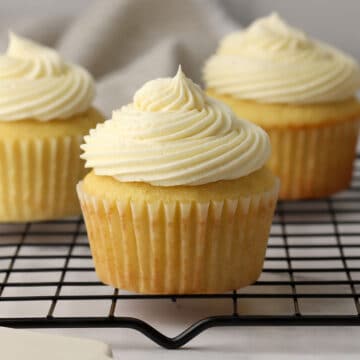
Flavor/texture: Light, fluffy, rich, and tangy cheesecake filling with a buttery graham cracker crust.
No cooking needed: No-bake cheesecake is made without the stovetop or oven, making it perfect for those hot summer months.
Pan size: 9x13 pan
Yield: 24 squares
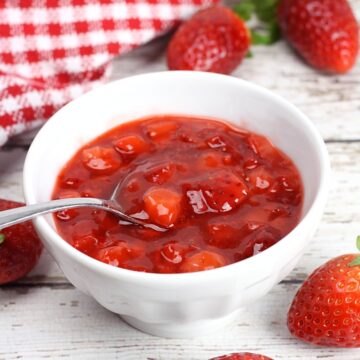
Optional toppings: Strawberry Topping for Cheesecake, Lemon Blueberry Topping for Cheesecake, and Raspberry Sauce For Cheesecake
Jump to:
Ingredients and substitutions
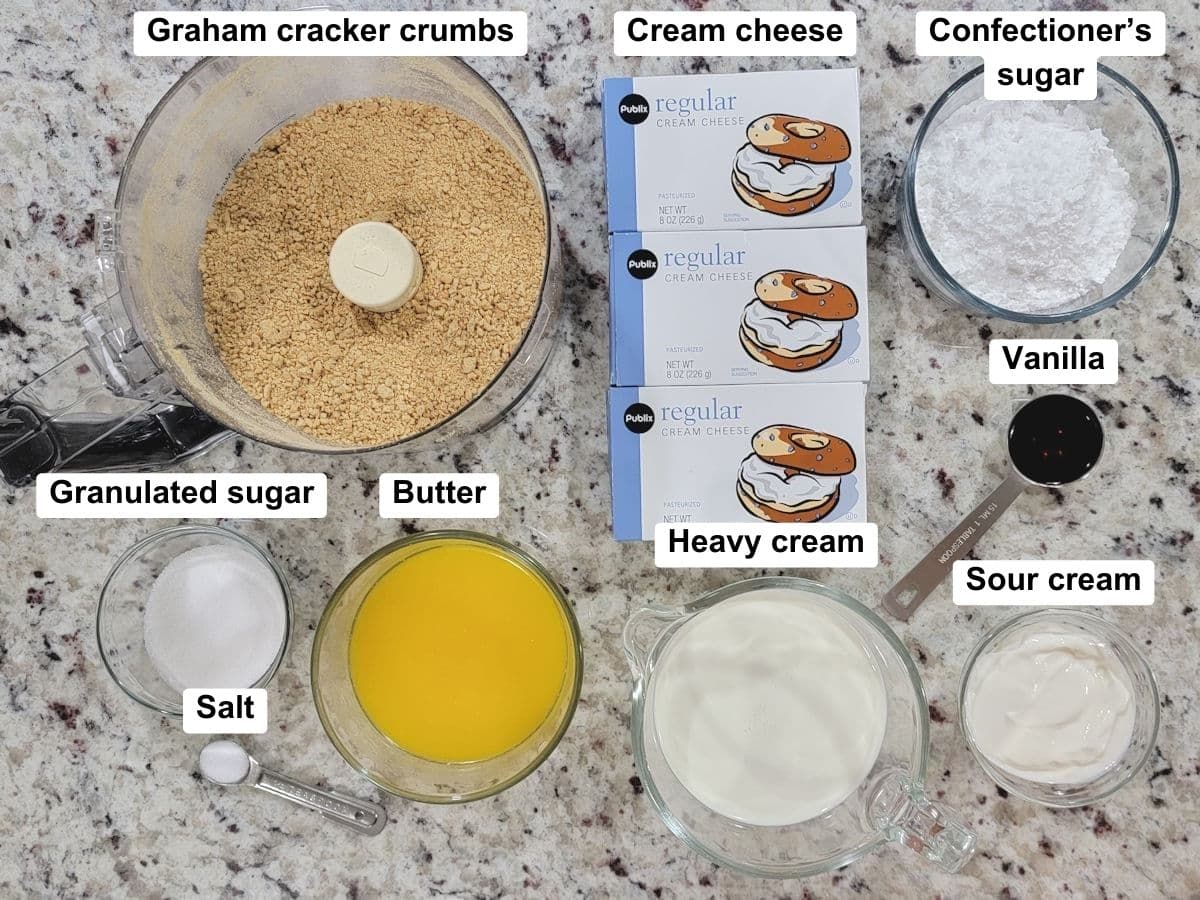
- Crust ingredients - The crust is made with graham crackers crumbs, melted butter, granulated sugar, and salt. You'll need 2 ¼ cups of graham cracker crumbs, or about 16 full rectangles. Honey, cinnamon, or chocolate graham crackers all work in this recipe.
- Cheesecake filling ingredients - Cream cheese (block-style only), confectioner's sugar, sour cream, vanilla, and heavy cream create the cheesecake filling. Heavy cream is a must because we're whipping it to create whipped cream, which makes your filling light, fluffy, and stable for slicing (once chilled).
- Cool Whip substitute - The heavy cream can be substituted with an 8 ounce container of Cool Whip if desired (skip the step of whipping and fold the Cool Whip into the cream cheese mixture as directed below).
How to make no-bake cheesecake bars
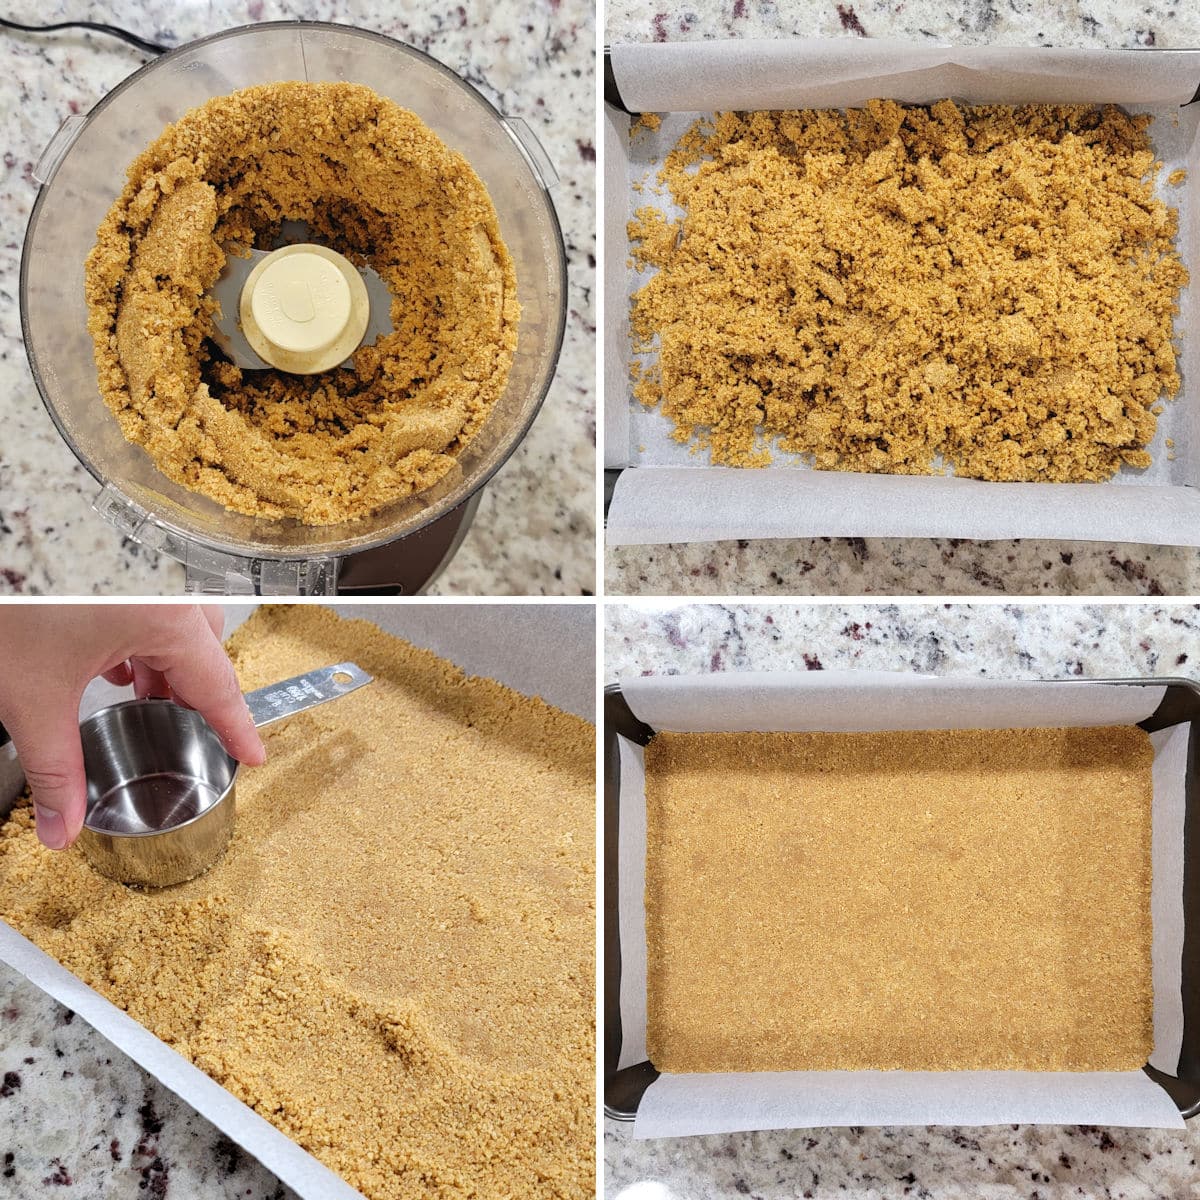
- Pulse together graham cracker crumbs, melted butter, sugar, and salt until thick and sandy.
- Spread into a parchment lined baking pan.
- Press crust firmly into the bottom of the pan and each corner. A measuring cup helps.
- Refrigerate until ready for the filling.
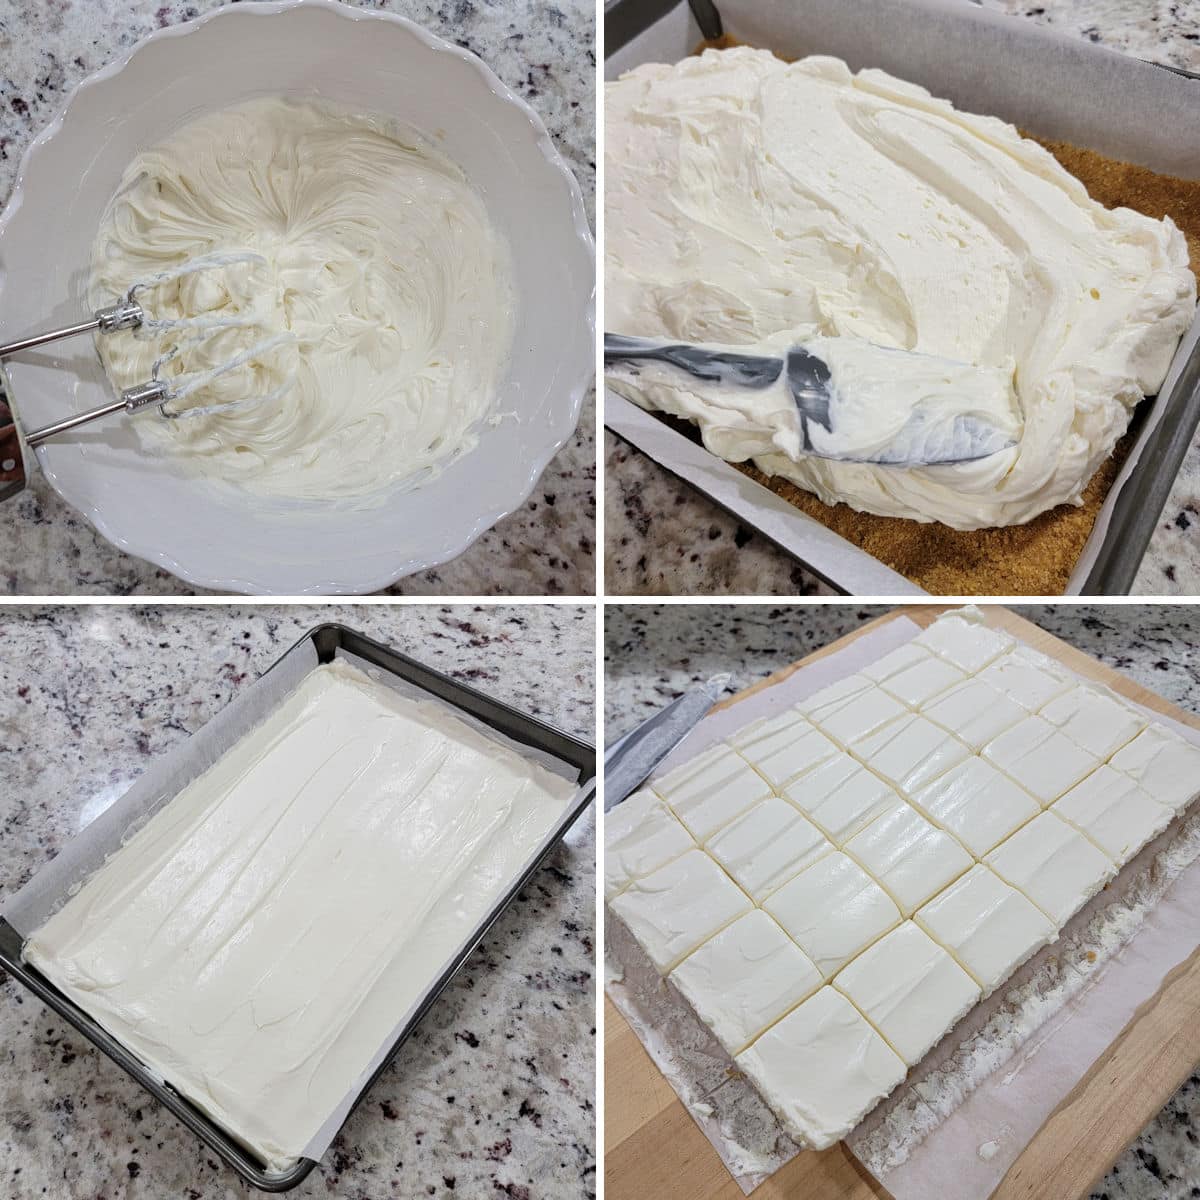
- Beat cream cheese until smooth, then add confectioner's sugar, sour cream, and vanilla and beat until smooth and creamy.
- Fold whipped cream into cream cheese mixture. Pour into prepared baking pan on top of your graham cracker crust.
- Spread into an even layer with a spatula. Refrigerate 8-12 hours or until firm.
- Slice and serve cold.
Crust tips and tricks
Properly measured graham cracker crumbs - Too many crumbs make a dry, crumbly crust, and too few crumbs make a soggy crust. I used exactly 16 Honey Maid brand graham cracker rectangles for 2 and ¼ cups of crumbs. Brand cracker size can vary, so use a kitchen scale or measuring cups for accurate results.
Do not reduce or omit the butter or sugar - The combination of melted butter and sugar helps create the glue that holds your crust together. Melted butter solidifies when refrigerated, and sugar attracts moisture, holding the crust together. Do not substitute or omit either of these ingredients.
Press your crust firmly into the pan - Use a flat-bottom measuring cup to help press the crust very firmly into the bottom of your pan. Make sure every inch of your crust is pressed down firmly, including the corners.
Filling tips and tricks
Whip your heavy cream to stiff peaks - Arguably the most important step in this entire recipe! Don't skip the step of whipping your heavy cream to stiff peaks. Adding heavy cream directly to your cheesecake filling will 100% result in a runny, liquid filling. It will never set up if it's not whipped first.
Substitute with Cool Whip - If you're concerned about making your own whipped cream properly, or don't have the proper tools to do so, heavy cream can be substituted with an 8 ounce container of Cool Whip.
Use room temperature, block-style cream cheese - Room temperature cream cheese mixes seamlessly with the other ingredients to create a smooth filling. Block style cream cheese (the rectangular brick type) is needed because it's thick, dense, and adds structure to your cheesecake. Whipped or spreadable cream cheese is too loose and fluffy.
Chill the cheesecake - Your bars need several hours in the refrigerator to set up properly. Allow them to set for 8-12 hours, or overnight. This dessert is best made the day before you'd like to serve them.
Keep your cheesecake refrigerated until ready to serve - Just like any dairy based dessert, cheesecake needs to be kept cold until ready to serve. Leaving no-bake cheesecake bars out in hot weather will cause it to melt and wilt over time.
Frequently asked questions
Structure: Traditional cheesecake is made with eggs for stability, then baked in the oven with a water bath. No-bake cheesecake is made by folding in whipped cream and refrigerating until set.
Texture: They're both made with similar flavor profiles - tangy, sweetened cream cheese - but have different textures. Traditional cheesecake is dense and rich, and no-bake cheesecake is fluffy and light.
Toppings: Traditional cheesecake can be served with warm toppings like hot fudge and warm fruit filling, whereas no-bake cheesecake will wilt and melt (it's basically a cheesecake mousse).
No-bake cheesecake has a fluffy, whipped texture when compared to traditional cheesecake. If you truly want a classic cheesecake taste and texture, you may be disappointed by no-bake cheesecake. The two really only share a similar flavor, but otherwise feel different texturally. Try my mini cheesecakes recipe for a classic cheesecake experience. They're perfect for a feeding a crowd!
Strawberry Topping for Cheesecake (pictured above)
Lemon Blueberry Topping for Cheesecake
Raspberry Sauce For Cheesecake
Lemon curd
Homemade Whipped Cream
Sliced fresh fruit
Homemade Cherry Pie Filling (room temperature or chilled)
More recipes
📖 Recipe
No-Bake Cheesecake Bars
Ingredients
Graham cracker crust
- 2 ¼ cups (248 g) graham cracker crumbs
- 9 tablespoons unsalted butter, melted
- 3 tablespoons granulated sugar
- ¼ teaspoon salt, omit if using salted butter
Cheesecake filling
- 24 ounces (681 g) block-style cream cheese, room temperature
- 1 cup (120 g) confectioner's sugar
- ¼ cup (57 g) sour cream
- 1 tablespoon vanilla extract
- 1 ½ cups (341 g) heavy cream, very cold
Instructions
Graham cracker crust
- If making graham cracker crumbs from whole crackers: Place graham crackers into a food processor and process until finely ground. Or place crackers in a large plastic bag and use a rolling pin to finely crush.
- If using a food processor: Add melted butter, sugar, and salt (optional) to food processor with graham cracker crumbs and pulse until fully incorporated. Or, add crumbs, butter, sugar, and salt to a bowl and mix until evenly combined. Your mixture should be thick and sandy.
- Line a 9x13 baking pan with parchment paper. Pour graham cracker mixture into prepared pan. Use the flat bottom of a measuring cup and/or your hands to press crust firmly into the bottom of the pan. Transfer to refrigerator while preparing filling.
Cheesecake filling
- In a large mixing bowl, add cream cheese. With a hand mixer, blend unto smooth and creamy, about a minute. Add confectioner's sugar, sour cream, and vanilla extract. Beat until smooth and creamy, about a minute.
- In a separate large bowl, add cold heavy cream. Using a hand mixer with a whisk attachment, whip for 2-3 minutes on medium speed until stiff peaks form. Once you begin to see ripples in the cream from your mixer and it appears to be holding its shape, stop the mixer and pull the whisk out of the bowl. If the tip of the whipped cream holds its shape without drooping, your whipped cream is ready. Take care not to over-mix or your whipped cream will separate.
- Using a spatula, gently fold whipped cream into cream cheese mixture until fully incorporated. Pour cheesecake filling over prepared graham cracker crust and using a spatula, spread to the edges of the pan in an even layer.
- Cover and refrigerate 8 to 12 hours, or overnight, until firm. Keep refrigerated until ready to serve. Slice and serve cold.
Equipment Recommendations
Notes
- Whipped cream substitution: 1.5 cups of heavy cream can be substituted with an 8 ounce tub of Cool Whip. Skip the step of whipping your cream, then fold Cool Whip into cream cheese mixture as directed.
- Graham cracker crumbs: 2 and ¼ cups of graham cracker crumbs equals about 16 full rectangle sheets, but can vary based on brand. Measure your graham crackers by weight (gram measurements are in parenthesis) or with cups.
- Storage: No-bake cheesecake will keep for 5 days in the refrigerator in a sealed container, and is best after resting for at least 8 hours. A great dessert to make a day or two ahead of an event.
Can this be done in a jelly roll pan? I need cheesecake bars for 80 & I’m trying to make it as easy as possible.
Hi MaryAnn, I haven't tried making this recipe in a jelly roll pan before so I can't say for sure how it would turn out.
My only concern would be whether the sides of the jelly roll pan would be too short to contain all the filling in this recipe. If you give it a try, let us know how it goes!
Oml 9 tablespoons of butter turned my crust into nothing but butter. I had to had 10 more graham crackers. I’ll stick to not measuring on my own the way I’m use to.
Hi Reva, it sounds like you had far too few graham cracker crumbs starting out. It's standard practice in graham cracker crust recipes to add about 1 tablespoon of butter per 1/4 cup of graham cracker crumbs.
A few questions that may help figure out what happened:
- Did you measure out two 1/4 cup measurements instead of 2 and 1/4 cups?
- The recipe previously called for "about 16 rectangles" did you use full sheets or break up the sheets and count 16 small rectangles? (I've since clarified this in the recipe card further)
- Did you use an oil-based butter substitute?
- Did your crust at any point look like the process photos in the post? The crust will look like damp, crumbly sand.