Want to know the secrets to baking the perfect cake? Today I'm sharing my favorite 10 tips for baking cake. Whether you're a beginner baker or looking to fine-tune your skills, these tips will help you make a moist and perfectly baked cake (or cupcakes)!
Making a cake from scratch, especially for a special event like a birthday or anniversary, can seem like a daunting task. After all, baking is an exact science. One wrong measurement can ruin an afternoon's work in the kitchen.
Since launching my website in 2017, cake recipes are consistently the most popular with readers. I've received countless questions about substitutions, baking times, pan sizes, and the most popular cake baking issue - how to prevent dry cake.
Want to learn how to make the perfect cake for your next celebration? Today I'm sharing ten tips that I've learned from years of baking, writing recipes, and fielding questions from readers like you.
1. Read the recipe before beginning
Maybe the easiest (and most often ignored) tip I can offer is to read the recipe completely before beginning. This can help prevent issues like realizing you don't have the proper ingredients or pan size on hand. Making last minute ingredient swaps can waste your time, ingredients, and effort when your cake doesn't turn out as expected.
I highly recommend reading the recipe from beginning to end at least once. If you don't have what you need on hand, head to Google and find another recipe that works for you.
2. Measure flour properly
If you've read any of my baking recipes, I may sound like a broken record at this point. I also go over this issue in my 10 tips for baking cookies post - it's the number one issue that I see in baking.
Adding too much flour to a cake or cupcake recipe can produce the following results:
- Cake has a bland/flour flavor.
- Cake turns out dry.
- Batter turns out stiff and hard to pour.
- Cake cracks in the oven.
The most accurate method for measuring flour is by using a kitchen scale and measuring by weight. This is the only way I measure flour in my own kitchen to ensure my recipes turn out perfectly every time.
Not convinced yet? Check out my flour measuring experiment below.
Flour measuring experiment
To test the accuracy of measuring flour with a measuring cup, I decided to conduct an experiment. Feel free to try this in your own home. You'll need a kitchen scale, a 1-cup measuring cup, a butter knife, and a container of all-purpose flour.
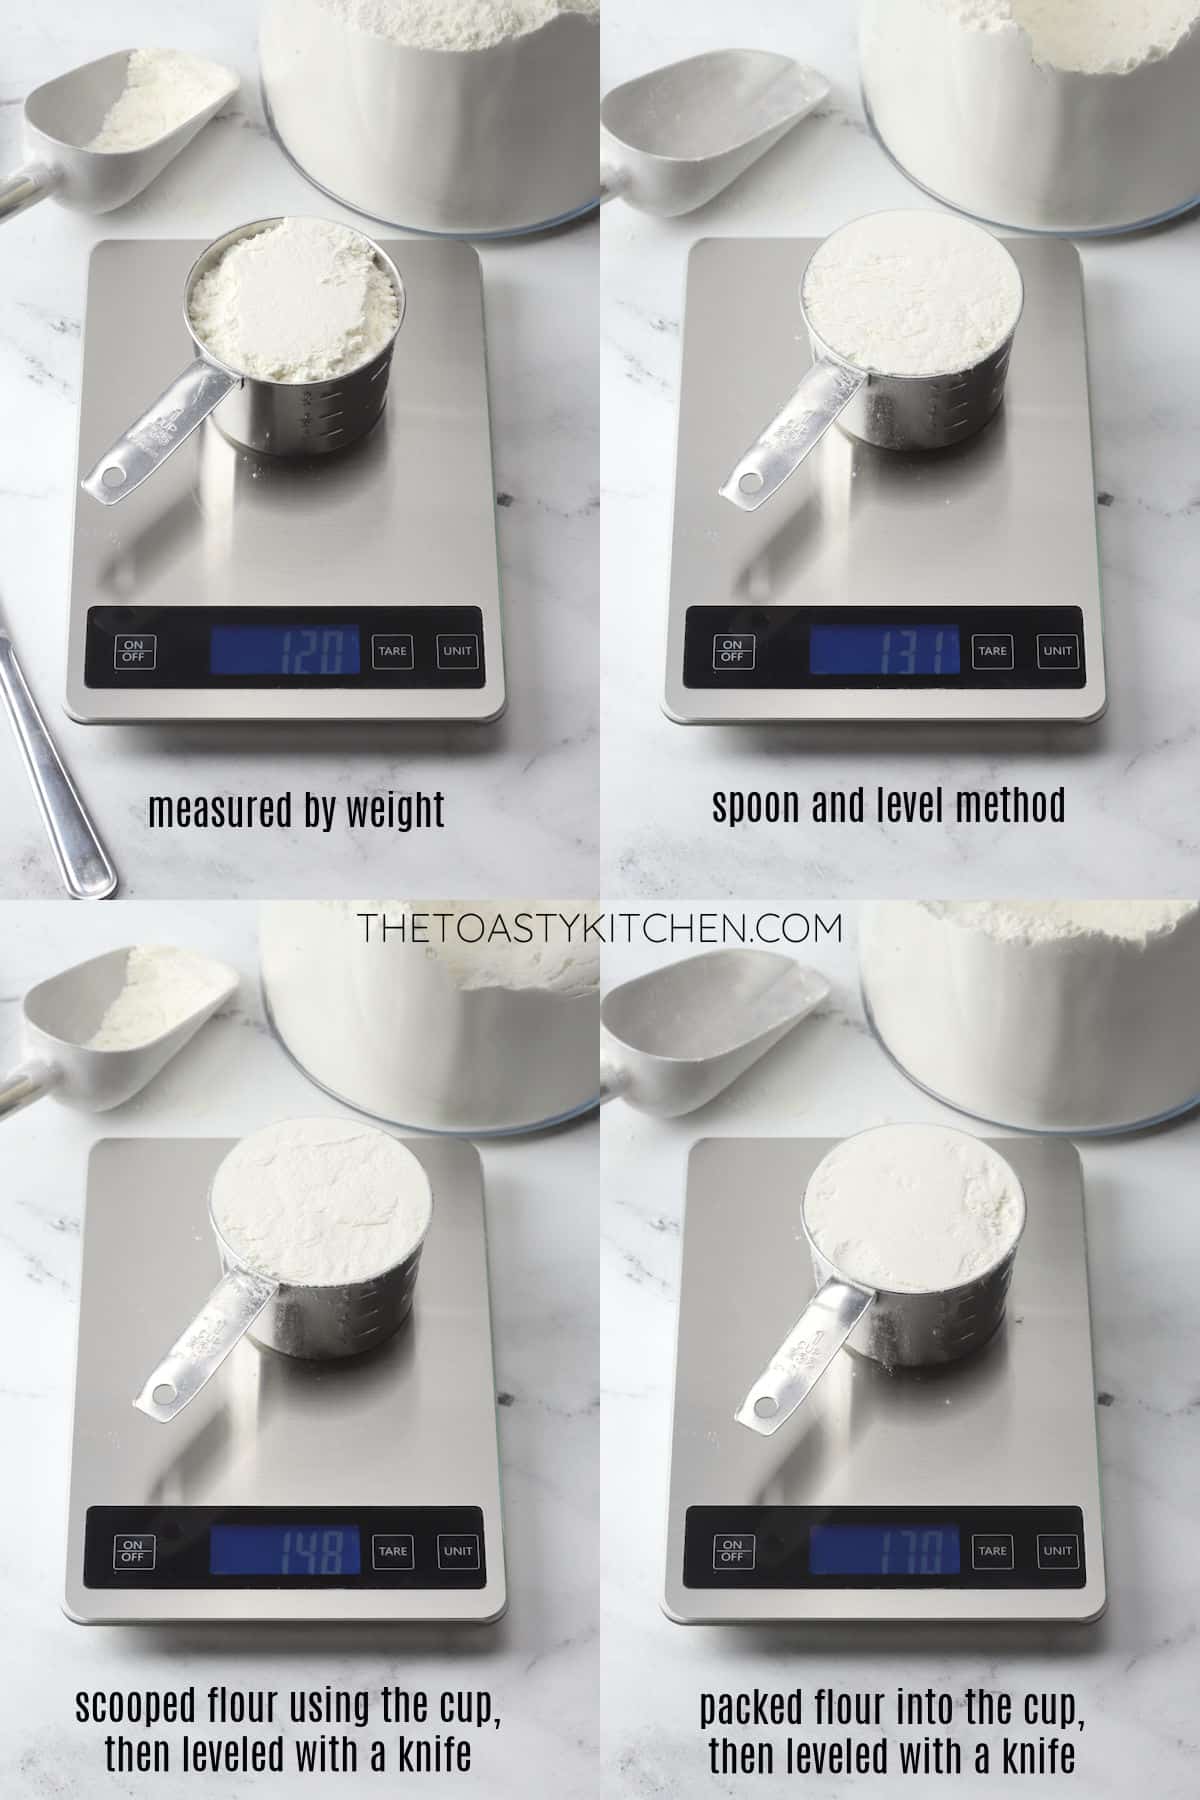
- 120 grams - measured by weight. I filled the measuring cup until the weight on the scale reached 120 grams (the weight of 1 cup of flour). It didn't even fill the cup to the top!
- 131 grams - spoon and level method. Next, I used the spoon and level method. I recommend this method when a reader doesn't have a scale.
- 148 grams - scooped with a measuring cup, leveled with a knife. Next, I did what I believe most home bakers do (likely mimicking cooks on television), and I scooped the flour straight from my flour container using the measuring cup (without packing it down).
- 170 grams - packed flour into the cup, leveled with a knife. Last, I had a little fun and tried to pack as much flour as I could into the measuring cup, like you would brown sugar. This is the worst way to measure flour - don't try this at home!
As you can see, measuring flour the proper way can make a huge difference in your baking. The difference between properly measured all-purpose flour (120 grams) and scooping with the measuring cup (148 grams) adds an extra 23% flour to a recipe.
Note - These measurements pertain to all-purpose (plain) flour only. Cake flour weighs slightly less than all-purpose flour, so I recommend using the actual weights listed in the recipe you're preparing.
3. Room temperature ingredients
Recipes may call for room temperature ingredients like eggs, butter, or cream cheese. But what exactly does this mean? In most cases, "room temperature" means about 70 degrees Fahrenheit.
Room temperature ingredients incorporate together to create a smooth, even cake batter. A consistent batter (without flecks of cold butter or egg throughout) bakes into a perfectly even cake.
To bring ingredients to room temperature, set them on the counter for 30 to 60 minutes beforehand. At room temperature, butter will be soft, but not melted or greasy.
To bring eggs to room temperature quickly, place them in a glass of warm tap water. To bring butter to room temperature quickly, slice into thin pieces for better air circulation.
4. Don't substitute ingredients
Arguably one of the most common questions I get on recipes is whether the reader can substitute x ingredient with y ingredient.
When important ingredients are substituted, like flour, eggs, sugar, and leavening, which add structure, moisture, and lift to a cake, it often doesn't work out the way you'd like. Every ingredient serves a purpose in a recipe and can't simply be halved or omitted without changing the texture/moisture/flavor of your cake.
Want to make a substitution? First, check the recipe for substitution notes (I include an 'ingredients and substitutions' section in every post). If the author doesn't offer substitutions, feel free to ask in the comments section (which is a great place to look for comments from other readers about substitutions).
Or, I suggest doing a Google search for a recipe that includes the ingredients you'd like to use. If you have an idea for a recipe, it probably already exists. There are tons of vegan, gluten-free, and dairy-free recipe writers with entire sites dedicated to these baking specializations.
5. Don't add extra ingredients
Due to the amount of comments and questions I get regarding adding extra ingredients to cake recipes, I thought this tip deserved a section of its own.
I'm frequently asked by readers whether they can add extra wet ingredients to their cakes "to make sure it turns out moist". Due to reasons I've listed above (adding too much flour or reducing/omitting ingredients), home bakers may have an issue with their cakes turning out dry. To combat this, they then add extra wet ingredients (like buttermilk, sour cream, or oil) to match that extra flour and ensure their cake turns out moist.
If you're properly measuring and not substituting/reducing/omitting ingredients, there's no reason to add more wet ingredients to make a cake moist. Cake recipes are written with specific proportions of wet and dry ingredients so that they work perfectly together to achieve the proper rise, texture, and moisture.
Adding too many wet ingredients can make a cake turn out dense, wet, or sink in the middle while baking. Do you simply love cake recipes that include sour cream? Instead of altering a recipe with additional ingredients, try searching Google for a sour cream cake.
6. Don't overmix your batter
Mix your dry ingredients just enough to incorporate them into the batter. Overmixing can overwork the gluten, causing your cake to turn out tough. Overmixing can also add excess (unstable) air into the batter, which causes your cake (or cupcakes) to rise quickly, then sink, while baking in the oven.
7. Ignore baking times
Okay - ignore may be strong, but hear me out. Think of baking times as "suggestions". They're simply times that worked for the baker at the time that they wrote the recipe.
Oven temperatures can vary greatly, even when set to the same temperature. Your oven may run 15 degrees hotter than my oven. Because of this, baking times will vary from oven to oven.
When in doubt (and especially when trying a brand new recipe), check your cake a few minutes early.
8. Checking for doneness
Don't rely on looks alone - it's best to check your cake for doneness using one (or more) of these methods below.
- Toothpick - Using a toothpick is a popular method to test for doneness. Stick a toothpick into the center of your cake or cupcake. If it comes out with crumbs, it's done. If it comes out with wet batter, it needs more time.
- Spring back - Press a finger gently onto the top of your cake. If it springs right back, your cake is done. If it leaves an indent, your cake needs more time.
- Thermometer - You can also use an instant read thermometer to test for doneness - cakes and cupcakes are done when they reach 205 degrees Fahrenheit in the center.
9. Allow cake to cool completely
Allow your cake to cool completely before slicing. Cutting into a piping hot cake releases steam, which is the moisture inside your cake. Releasing this steam makes your cake dry. Instead, allow it to cool completely to room temperature before slicing or frosting.
Many frostings are made with butter or shortening as the base, both of which melt at high temperatures. Don't try to frost a warm cake - your frosting will melt.
Unwrapping cupcakes while warm can cause the cake to stick to the wrapper. Instead, allow your cupcakes to cool completely. They'll release from the wrappers easily once cooled.
10. Freeze cake made in advance
Want to make cake ahead of time, but don't want it to dry out? Freeze it.
Cake freezes and thaws very well, which makes freezing the ideal method of storage. Cake layers, sheet cake, and cupcakes can all be frozen and thawed ahead of your next event.
If you're serving your cake within 24 hours, it's fine to store at room temperature (unless it contains a filling or frosting that must be refrigerated).
Refrigerators are dry with low humidity, making them less than ideal for storing a cake you'd like to keep moist. I don't recommend refrigeration unless you plan on serving your cake within 24 hours and it contains a filling or frosting that requires refrigeration.
More resources
Here are more resources you may find helpful on your baking journey:
- King Arthur Flour - High-Altitude Baking - What to change, how to change it, and why.
- King Arthur Flour - Ingredient Weight Chart - Volume, ounces, and gram measurements for common ingredients.
- Joy of Baking - Baking Pan Sizes - Determine the volume of different pan sizes.
- Thermoworks - Doneness Temperatures for Baked Goods - Perfectly bake your next cake by checking its internal temperature for doneness.



Hello, I am new to your site. I am trying your vanilla sheet cake recipe! I read your to tips. I want to make the cake the evening before and Friday the next morning before the afternoon party, and avoid refrigeration completely. How do you recommend I cover the 13x18 in pan to store it unfrosted over night? I am afraid plastic wrap will stick to the surface, and simply pacing another same sized pan on top is not air tight. Help!
I agree, I would avoid using the refrigerator for storage because it would dry the cake out more quickly. I would wrap it well in plastic wrap to leave it at room temperature overnight. You could also use a layer of wax paper and layers of foil on top if you're worried about using plastic wrap. Another alternative would be to wrap in plastic and freeze overnight to maintain its moisture (frozen cake is also easier to frost the next day and thaws within a few hours) but is probably unnecessary for just one night.