


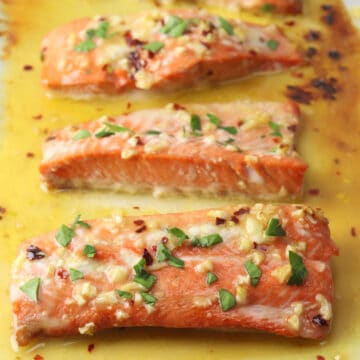
Pan-seared salmon is a simple, easy, and impressive main dish that can be ready in less than 20 minutes. Salmon fillets turn out tender and flaky with a crispy crust basted in garlic butter.

Why this recipe works
It's quick. It's made on the stovetop - no need to wait for the oven to preheat.
It's elegant. While this recipe is quick and easy, it's impressive enough to serve to dinner guests.
Crispy crust. Pan-searing creates a golden, crispy crust that's irresistibly good.
Serves: 2 people
Serve with: Roasted Zucchini and Squash or Sesame Rice (pictured)
Jump to:
Ingredients and substitutions

- Salmon - I recommend using 6-ounce salmon fillets with the skin on or off. Salmon can be frozen or purchased fresh from your local fish counter for this recipe. If you're using frozen salmon, make sure it's completely thawed before beginning the recipe.
- Seasoning - Salt and pepper add a mild, savory flavor to the salmon.
- Oil - Olive oil helps create that crispy, golden crust on the outside of your salmon. I don't recommend omitting the oil from the recipe or substituting with butter, which can burn before your salmon is cooked through.
- Butter - Adds flavor and moisture, and is used to baste the salmon while it cooks.
- Garlic - Adds significant flavor to the dish. I highly recommend using fresh minced garlic instead of jarred garlic, which often has a harsh flavor.
- Parsley - Fresh parsley adds a light, peppery flavor to the finished dish, as well as a splash of color for visual appeal.
- Lemon - A squeeze of lemon just before serving adds bright, citrus flavor and a bit of acidity to cut through the fattiness of the salmon and butter sauce.
How to pan-sear salmon

- Pat your salmon dry with a paper towel, then season with salt and pepper. In a nonstick pan over medium heat, add oil and place your salmon skin side down (if your salmon has skin).
- Once the first side is golden brown and crispy, flip to the second side. Add butter and allow to melt.
- Gently baste your salmon fillets with melted butter while the second side cooks.
- Once the salmon has been removed from the pan, add garlic and parsley and cook for 30 seconds before pouring over your finished salmon fillets.
Tips and tricks
Frozen salmon - Have frozen salmon on hand? Transfer it to the refrigerator to thaw overnight. If you forgot to thaw your salmon, place fillets in a tightly sealed plastic bag, then immerse in a bowl of very warm tap water. If needed, place another bowl on top to weigh the salmon down. Allow it to set for 20 minutes to thaw your salmon safely.
Pat dry - Give your salmon fillets a pat all over with a paper towel before seasoning. This helps the outside sear up nice and crispy instead of soggy.
For salmon with skin - Start cooking your salmon with the skin side down. This gives the skin time to crisp up while protecting the delicate flesh of the salmon.
Flip carefully - Salmon is delicate, so take care to flip it gently to avoid breaking the fillet.
Basting salmon - Tilt the skillet slightly to allow melted butter to pool to one side. Use a large spoon to scoop up the butter and gently pour over the salmon fillets. This adds flavor and moisture to your salmon while it cooks.
Browning garlic - Don't walk away during this last step! Garlic cooks quickly, so it only needs 30 seconds or less in the pan along with the parsley.

Frequently asked questions
Salmon should be seared for about 4 to 5 minutes on the first side to achieve a golden, crispy crust, then flipped and cooked as long as it takes to achieve your desired internal temperature. The second side generally takes about 3 to 4 minutes, but can vary based on the thickness and starting temperature of your salmon.
Salmon should be seared in oil because it has a higher smoke point than butter. This helps create that golden, crispy crust. Cooking butter for the same amount of time can cause burning and smoking, which will affect the flavor of your fish.
No, there's no need to remove the skin from your salmon before cooking.
Yes, if your salmon has the skin on, start with the skin side down. This not only creates that golden, crispy crust, but also helps protect the delicate flesh of the salmon.
I don't recommend pan-searing salmon from frozen for several reasons. The seasoning does not stick to frozen salmon and will fall off in the pan. Salmon releases moisture as it thaws, which can make the crust soggy instead of crispy. Last, the center will not cook through in the times listed in the recipe card because you're starting with a much colder internal temperature. This can cause the outside to burn before the center is cooked through to your liking.
Recommended


📖 Recipe

Pan-Seared Salmon
Ingredients
- 1 tablespoon olive oil
- 12 ounces salmon fillets
- ½ teaspoon salt
- ¼ teaspoon pepper
- 2 tablespoons unsalted butter
- 2 cloves garlic, minced
- 1 teaspoon minced parsley
- lemon wedges, for serving
Instructions
- In a nonstick pan over medium heat, add olive oil.
- Pat salmon fillets dry with a paper towel, then season all over with salt and pepper.
- When hot, add salmon to the pan skin side down (if your salmon has skin) and cook for about 4-5 minutes, or until golden brown on the bottom and cooked at least halfway up the side of the fillets.
- Carefully flip and add butter to the pan. Once butter has melted, gently spoon butter over the salmon as it cooks. Continue cooking and basting salmon until cooked through to your desired internal temperature* (cooking time depends on the thickness of your fish).
- Remove salmon from the pan and add garlic and parsley to the remaining pan butter. Cook for about 30 seconds, or until garlic is lightly browned.
- Pour garlic and parsley over salmon and serve with lemon wedges.
Equipment Recommendations
Notes
- *Salmon internal temperature: The USDA recommends cooking salmon to an internal temperature of 145 degrees Fahrenheit, or well-done. Some prefer the flaky texture of salmon around 125-130 degrees Fahrenheit, or medium doneness.
- Leftovers: Leftover salmon will keep for 3-4 days in a tightly sealed container in the refrigerator.
- Reheating: To gently reheat leftover salmon, heat a nonstick pan to medium-low heat, add salmon and a splash of water, and cover with a lid or tent with foil. Steam, adding more water as needed, until salmon is warmed through to your liking. Alternatively, preheat oven to 275F, lightly tent salmon with foil, and bake for 10-15 minutes.
I had so much fun creating this recipe! I hope you give it a try and love it as much as I do. If you have a question, check out the post above, which is packed with information about the recipe. Tried the recipe? I'd love to hear your thoughts — leave a comment and a star rating to share your feedback!