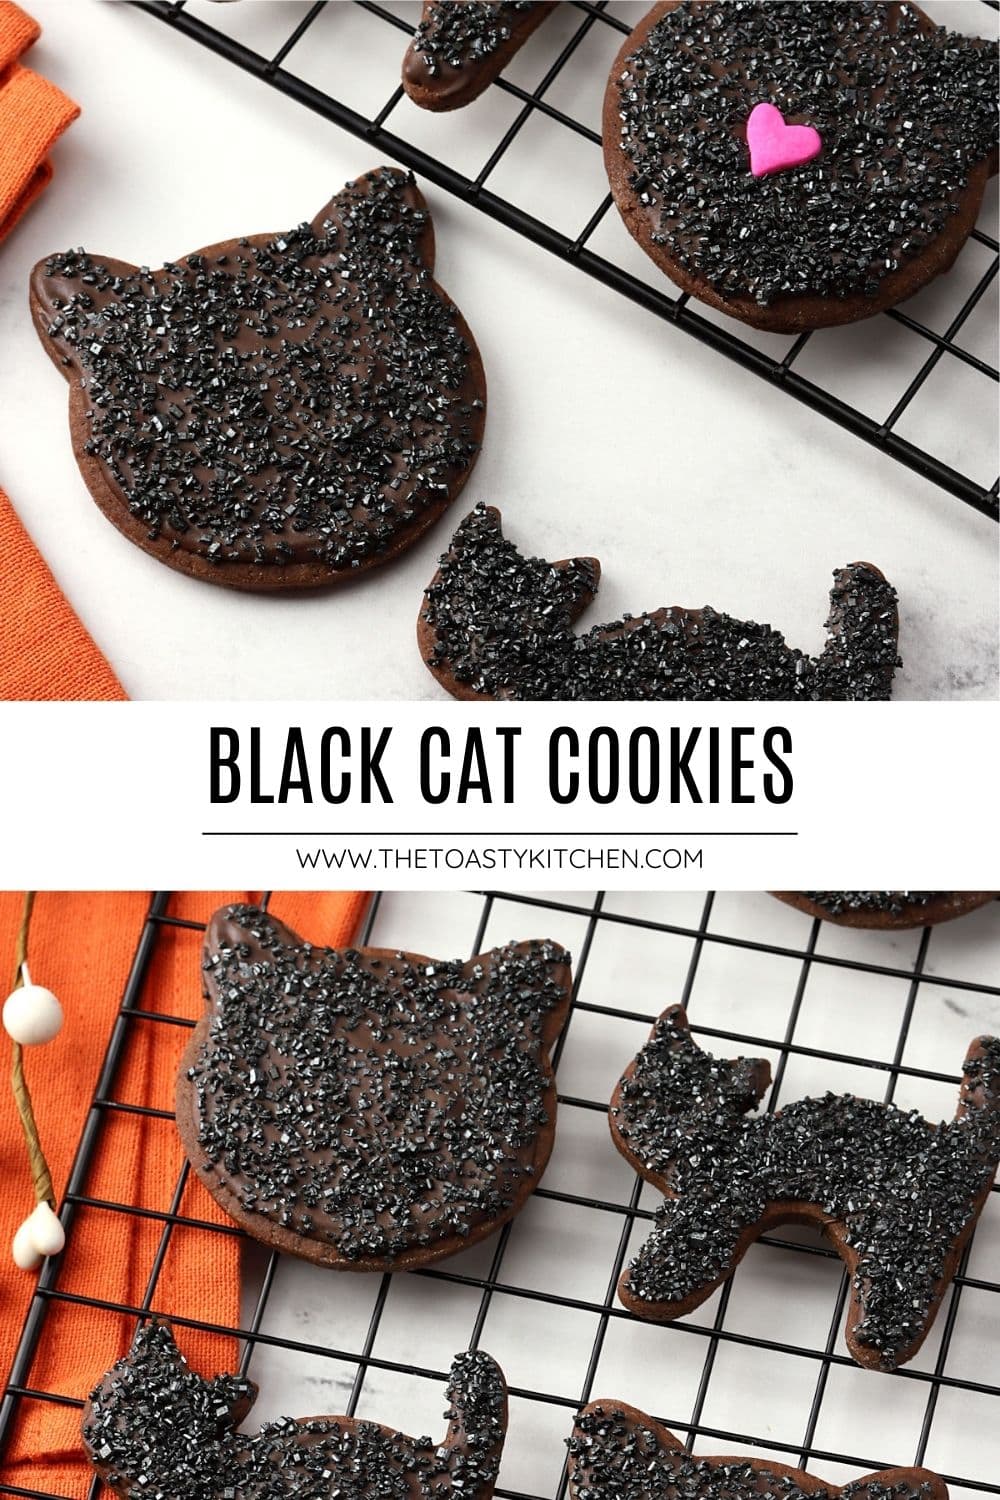
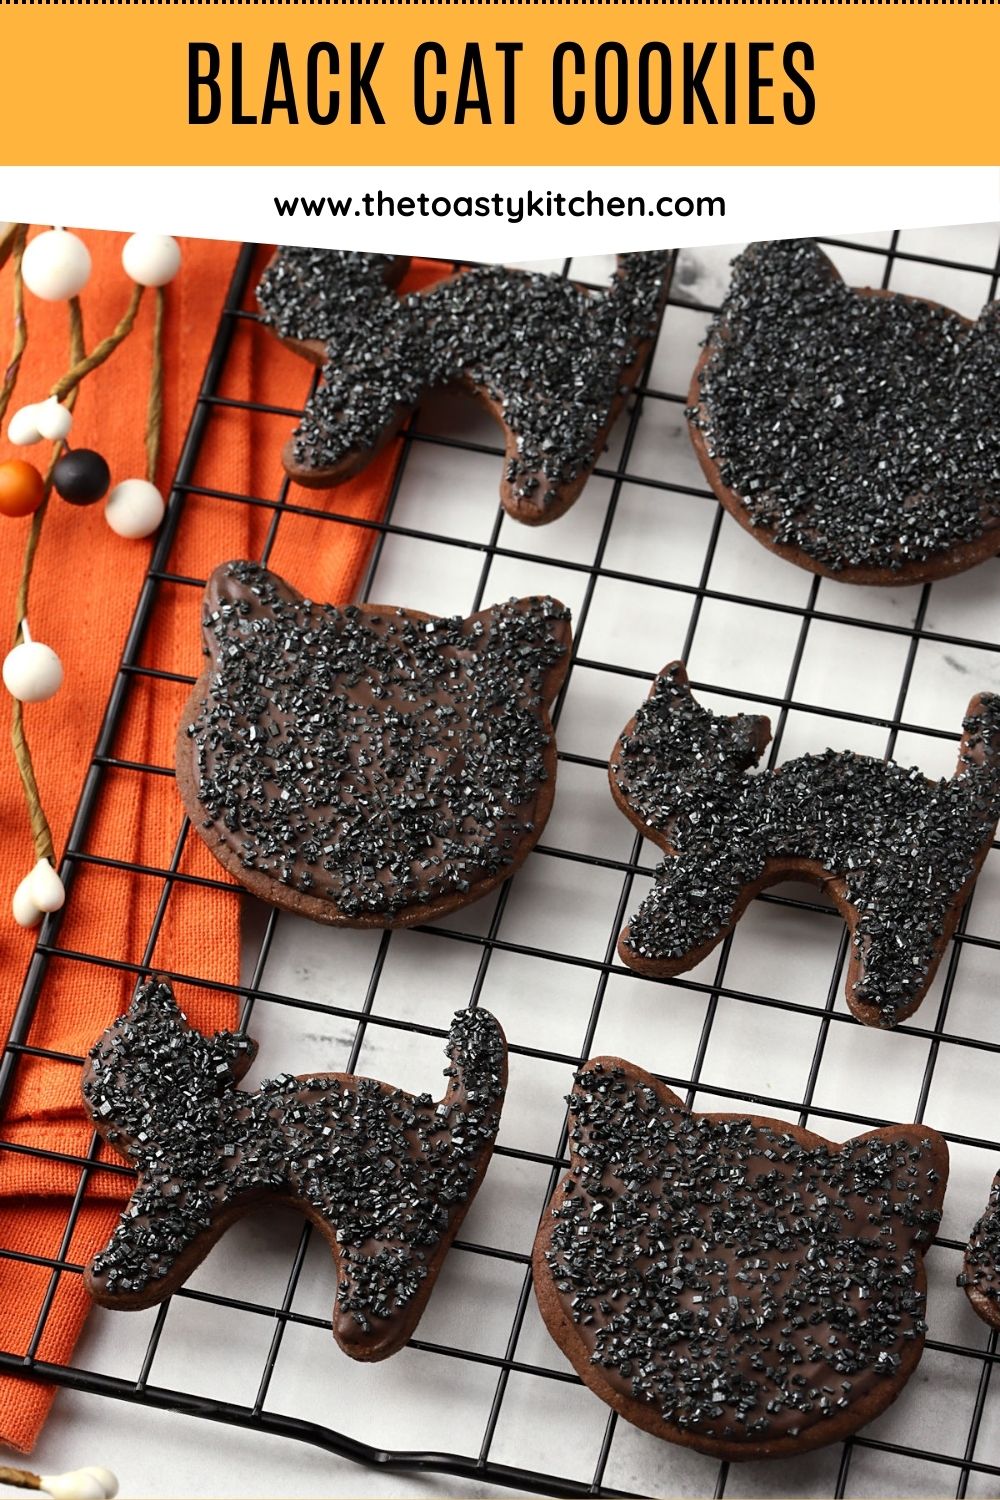
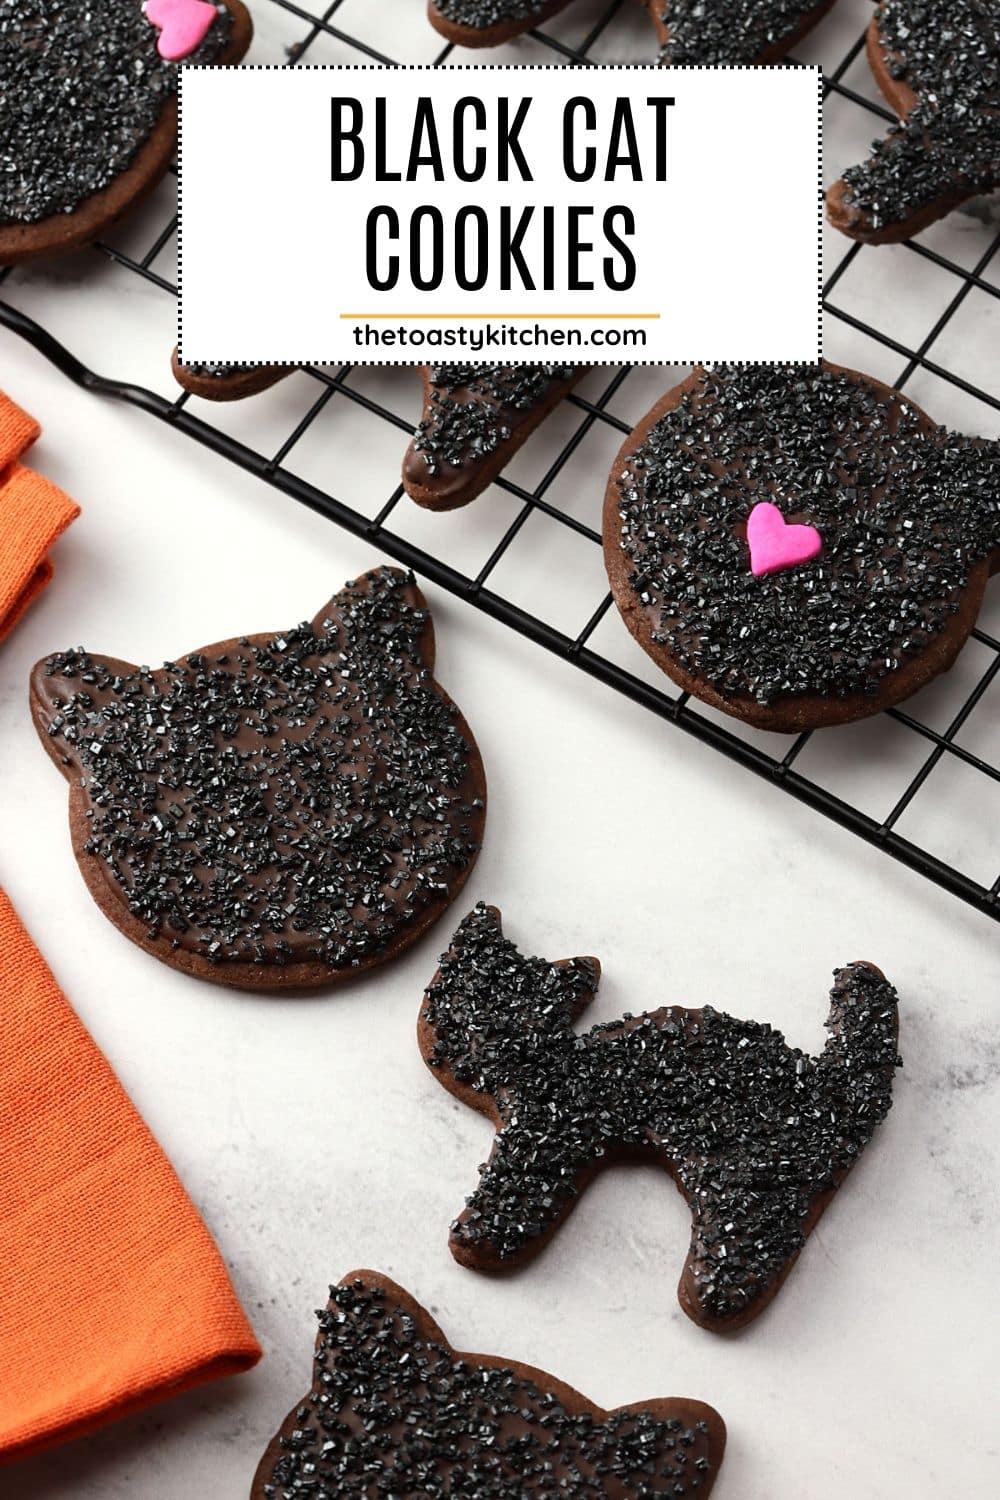
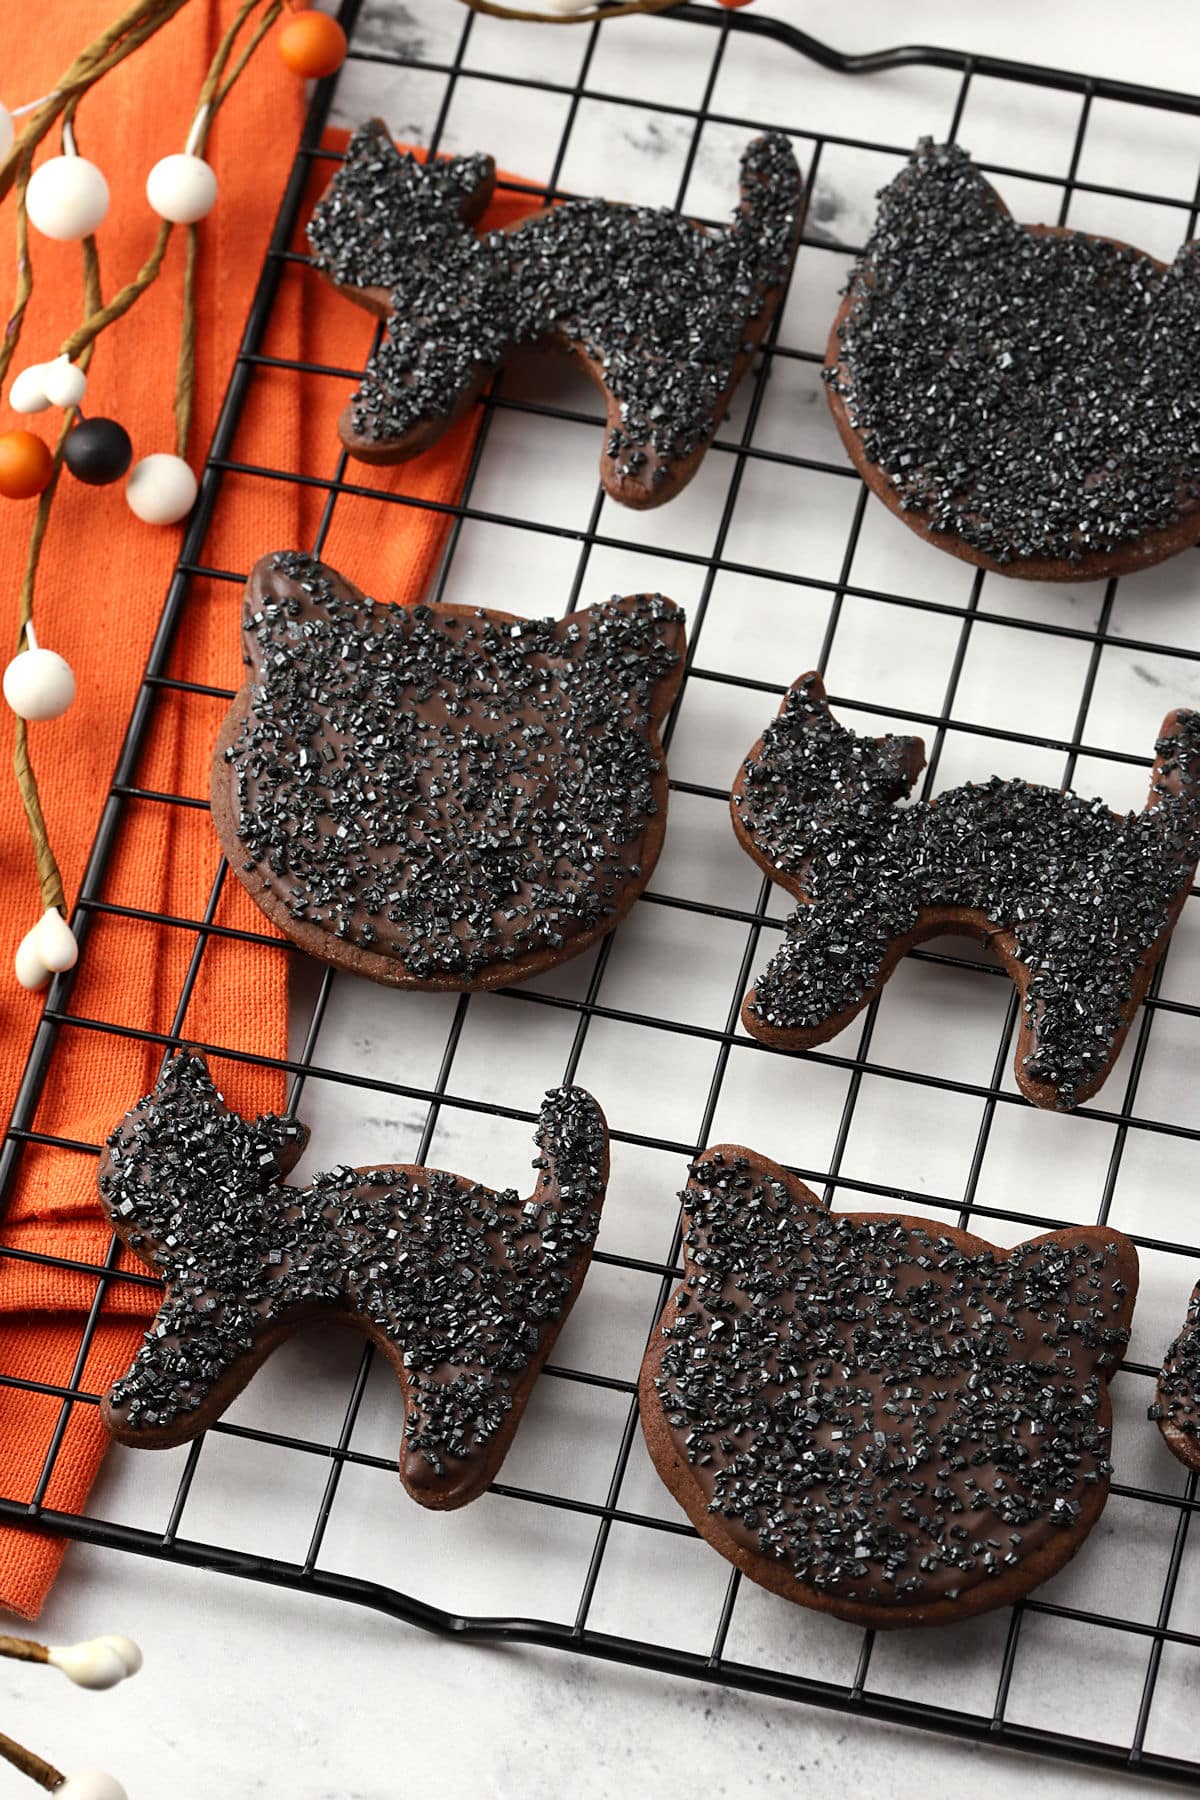
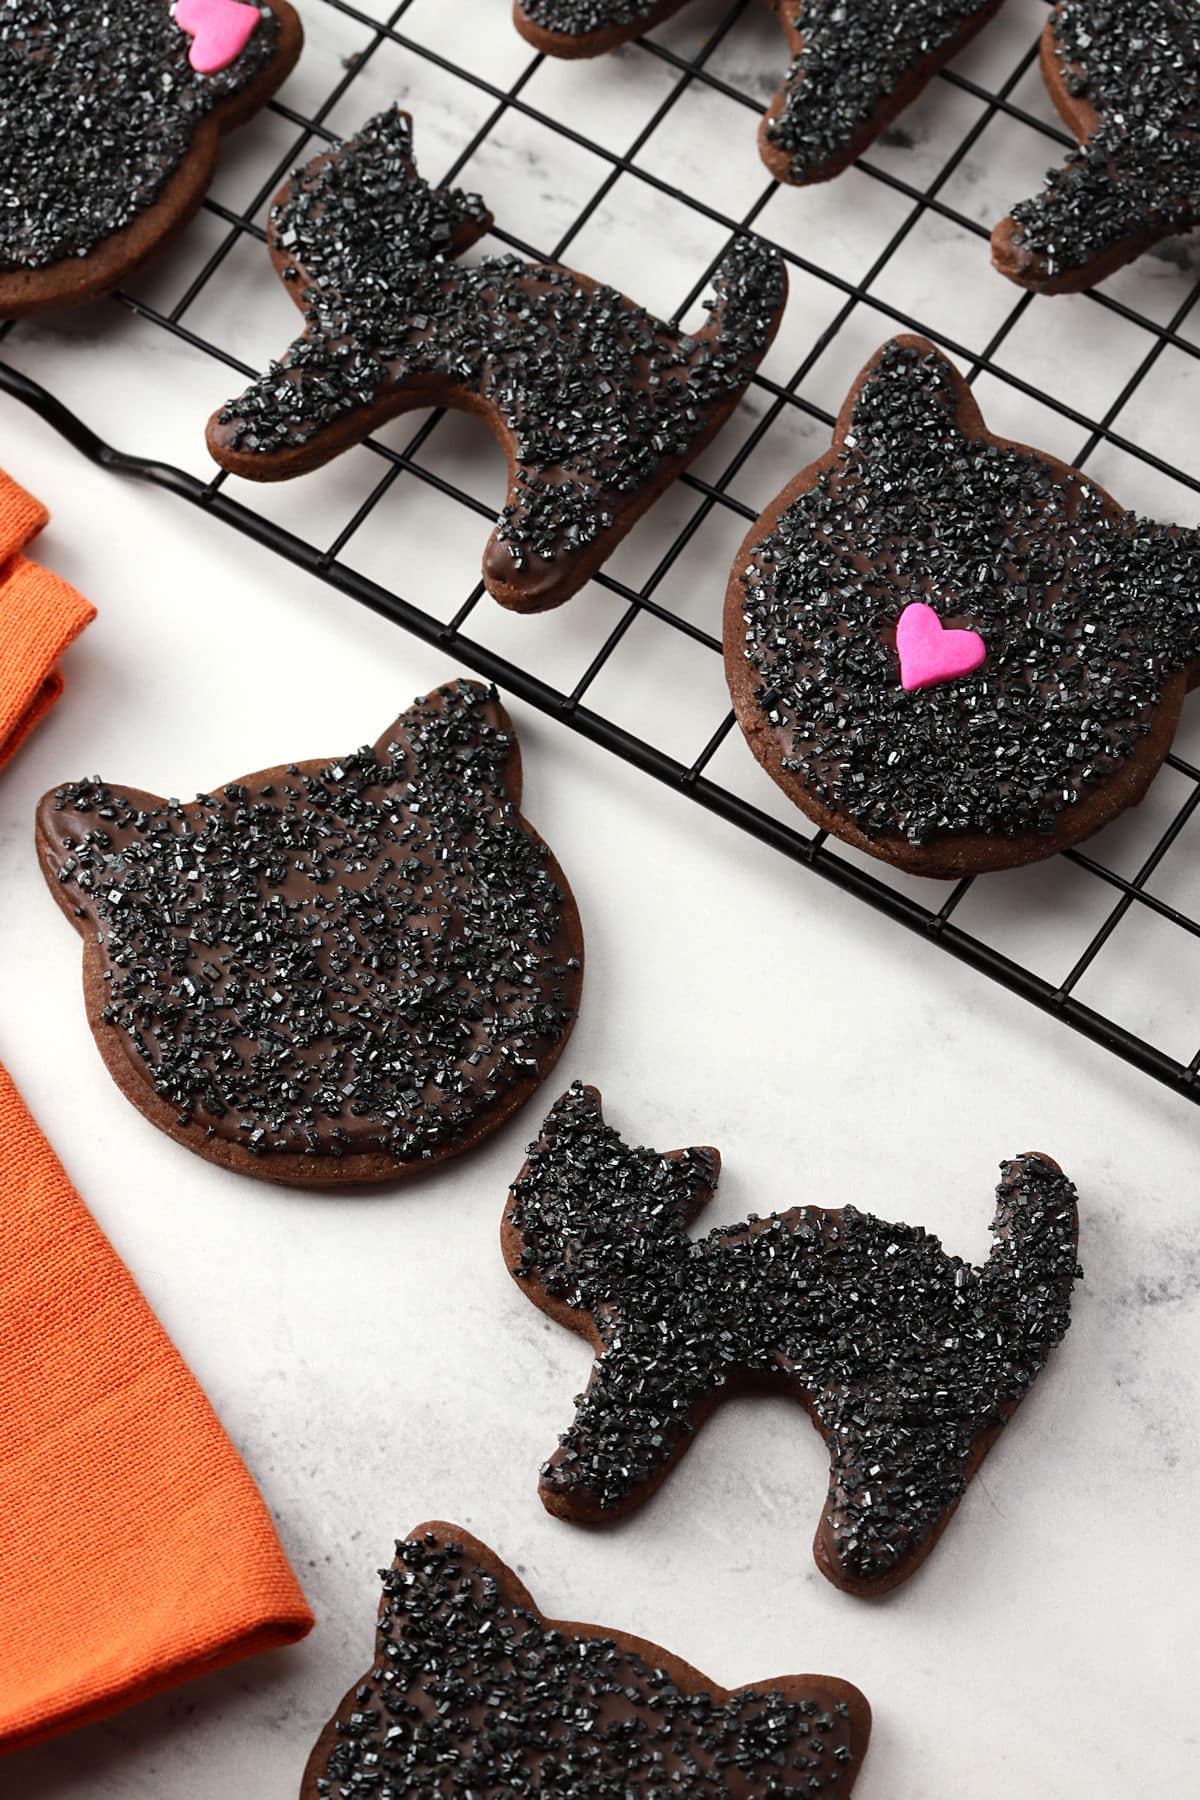
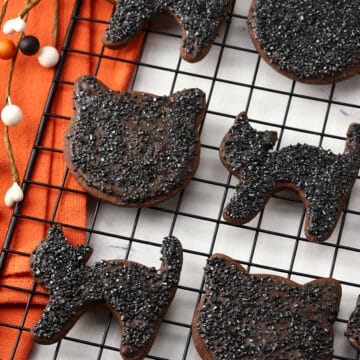
Make a batch of cute black cat cookies this Halloween. They're made with soft, no-spread chocolate dough topped with a thin layer of chocolate and sprinkles.
Heather's recipe summary
Flavor/texture: Tender chocolate cookies are topped with rich dark chocolate and crunchy black sprinkles.
Cute and easy to customize. Add chocolate covered sunflower seed eyes, a heart nose, or leave them blank for a classic Halloween cat silhouette!
Yield: About 36 cookies
Similar to: Halloween Cut Out Cookies and Chocolate Cut Out Cookies
Jump to:
Ingredients and substitutions
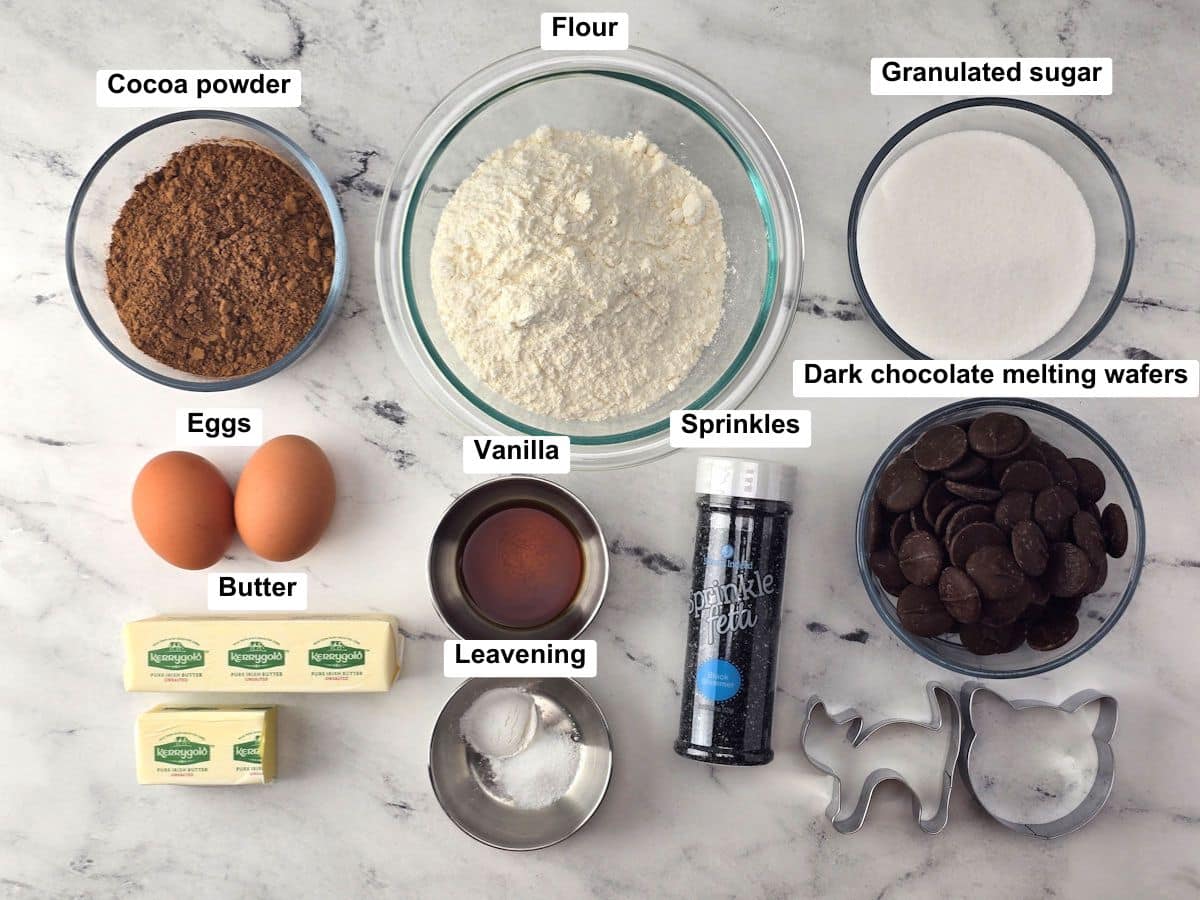
- Dry ingredients - Natural cocoa powder, all-purpose flour, baking powder, and salt balance with the wet ingredients. Natural cocoa powder and Dutch cocoa powder both work in this recipe.
- Wet ingredients - Unsalted butter, eggs, granulated sugar, and vanilla add flavor and moisture to your cookie dough. Reducing or omitting these ingredients can cause dough to turn out dry and crumbly.
- Melting wafers - You'll need dark chocolate melting wafers or chocolate chips for your cookie coating. I like to use melting wafers because they melt easily and dry quickly into a thin, candy coating on top of the cookies.
- Sprinkles - You'll need black sanding sugar sprinkles to achieve the same fuzzy black cat look shown in the photos. I purchased mine on Amazon (Sweets Indeed Sprinkles - Black Shimmer).
How to make black cat cookies
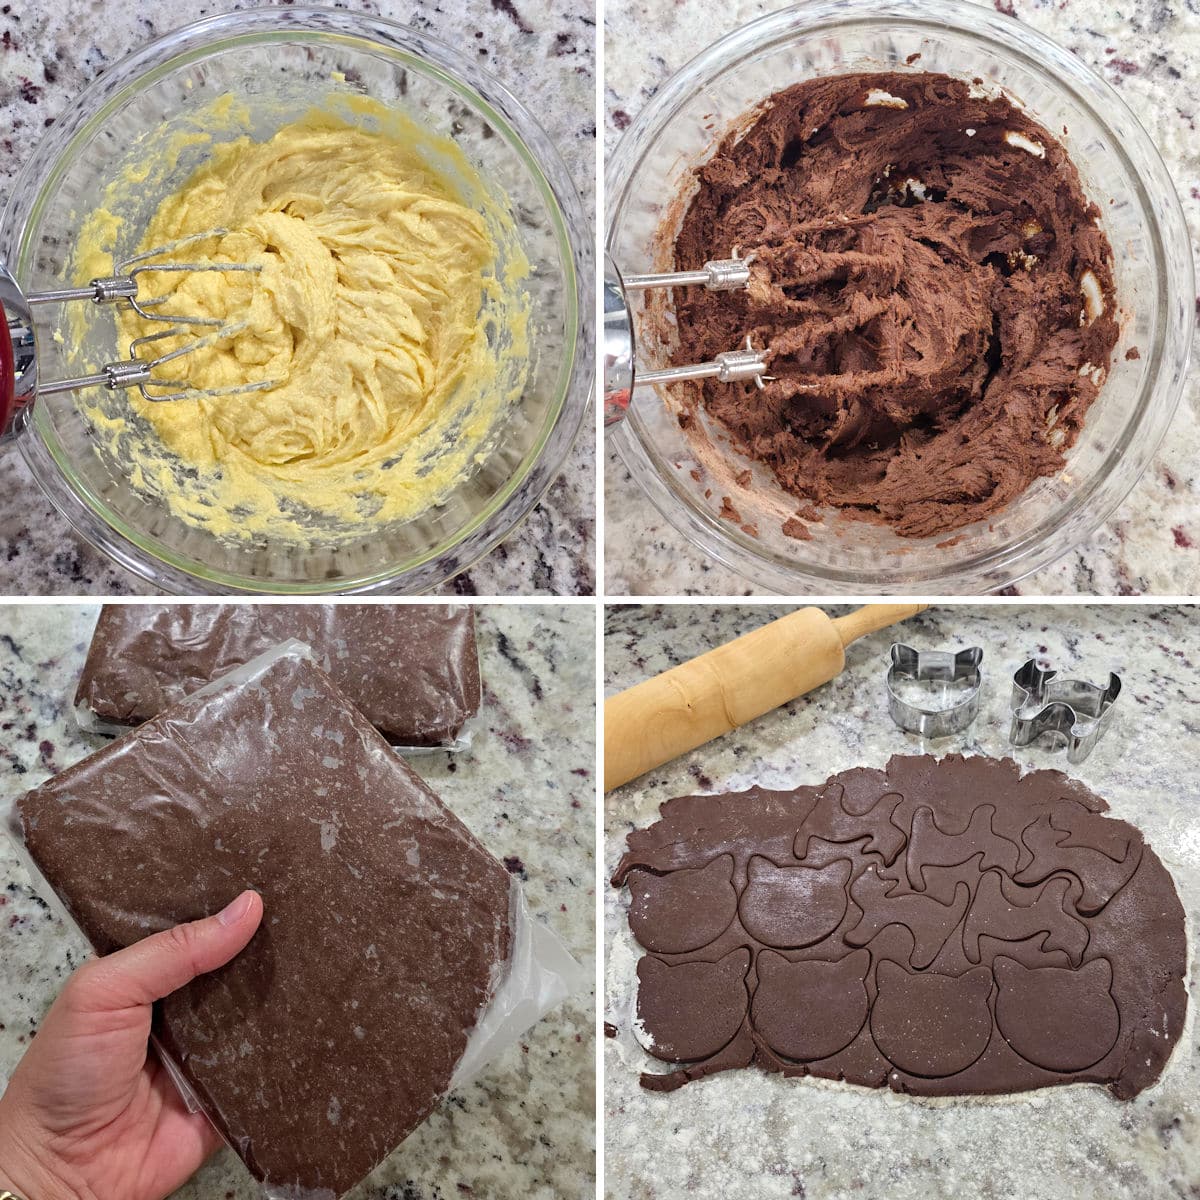
- Cream together wet ingredients until light and fluffy.
- Whisk dry ingredients in a separate bowl, then stir into wet ingredients until just incorporated.
- Divide dough into two discs, wrap in wax paper or parchment, and refrigerate for 30 minutes.
- Roll dough out onto a floured surface and use cookie cutters to make shapes.
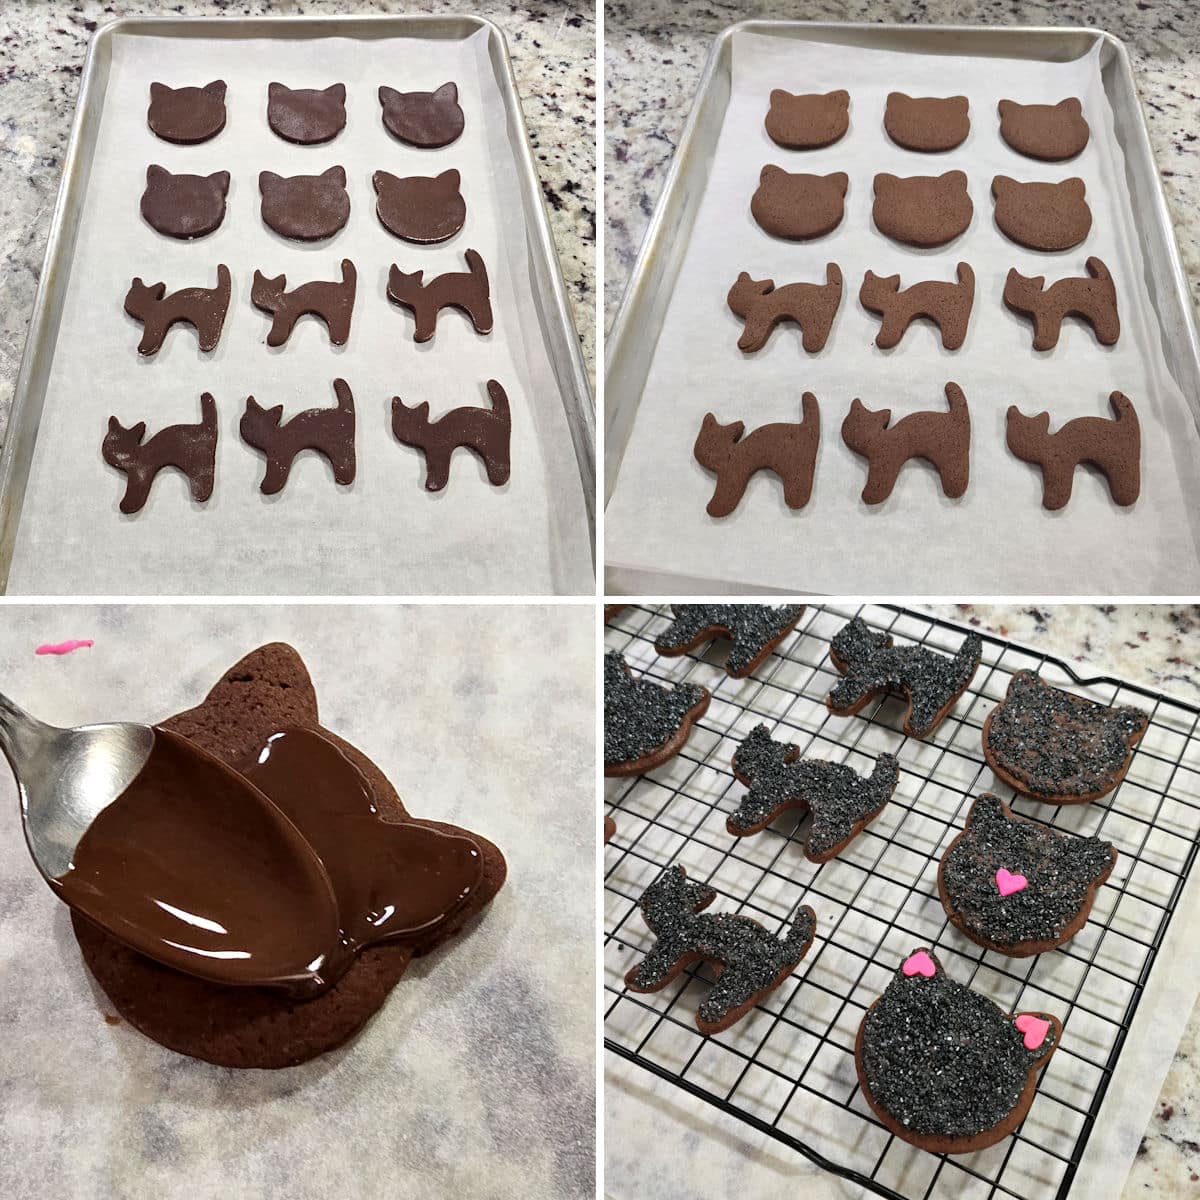
- Transfer cookies to a parchment lined baking sheet.
- Bake until cookies feel set when gently pressed in the center.
- Melt wafers and spread into a thin layer over each cookie.
- Top with black sprinkles and other optional decorations.
Heather's Top Tip
For accurate results every time, use a kitchen scale to measure flour by weight. If you don't have a kitchen scale, use the spoon and level method. Stir the flour (especially if it's been packed down in a bag/container), then gently spoon into the measuring cup, leveling off the top with a knife. Scooping with a measuring cup compacts flour into the cup and adds up to 25% extra to the recipe, resulting in dry, bland baked goods.
Tips and tricks
Chill dough - Once your dough is mixed, wrap it up and place it in the refrigerator for at least 30 minutes. Your dough can rest as long as 24 hours if you'd like to make it the day before. Chilling the dough reduces stickiness and makes it easier to roll out. It also helps your cookies spread less while baking in the oven.
Handle dough as little as possible - When you are ready to roll out the dough, try not to handle it too much with your hands. This warms up the dough faster, causing it to spread in the oven.
Dust everything with flour or cocoa - Think about everything that’s touching the dough: the counter top or parchment paper, cookie cutters, rolling pin, and even your hands. A little flour or cocoa powder will help prevent sticking.
Add icing and decorations - These cookies are lightly sweetened and meant to balance with a sweet topping like icing or chocolate. Don't forget to decorate your cut out cookies! They'll taste best once they're complete.
Frequently asked questions
No, these cookies turn out soft and tender throughout. This is due to the proportions of flour/egg/butter as well as the addition of two eggs that help keep the cookies soft.
Here are a few common reasons why your cut out cookies are spreading in the oven and how to prevent this from happening:
- Using grease instead of parchment. Adding grease to a baking sheet will cause any cookie (not just cut out cookies) to spread more than they should. This recipe calls for a parchment lined baking sheet.
- Your dough is too warm. If your dough has spent a long time out of the refrigerator or you've handled it too much, it will spread more in the oven. To prevent this, chill your baking sheet with cut out cookies in the refrigerator for 10 minutes before baking.
- Placing dough on a hot baking sheet. A hot pan will melt the dough before your cookies make it to the oven. Use two baking sheets and rotate them out, or allow your pan to cool before loading it up with more cookies.
Too much flour will cause your dough to be dry, crumbly, and tough. If your dough is too dry, add 1-2 tablespoons of milk and mix to incorporate. The most accurate way to measure flour is with a kitchen scale (this is what I do and what I recommend to others). If you don't have a scale, spoon your flour into a measuring cup, then level off with a knife. When scooping directly from a bin with a measuring cup, this compacts the flour into the cup, adding up to 25% extra flour to your recipe.
Recommended

📖 Recipe
Black Cat Cookies
Ingredients
Cookies
- ¾ cup (170 g) unsalted butter, room temperature
- ¾ cup (150 g) granulated sugar
- 2 large eggs
- 2 teaspoons vanilla extract
- 2 cups (240 g) all purpose flour, *measured properly
- ¾ cup (63 g) cocoa powder, natural or Dutch process
- 1 teaspoon baking powder
- ½ teaspoon salt
Decorations
- 5 ounces (140 g) dark chocolate melting wafers
- ¼ cup black sanding sugar
Instructions
Cookies
- In a large bowl with a hand mixer (or stand mixer), cream together butter and sugar. Add eggs and vanilla extract and beat until fluffy, about a minute.
- In a separate bowl, sift (or whisk) together the flour, cocoa powder, baking powder, and salt.
- Add dry ingredients to butter mixture and mix until just combined (do not overmix). Shape dough into two round discs and wrap in wax paper or plastic wrap. Refrigerate for at least 30 minutes (up to 24 hours).
- Preheat oven to 350℉ and line a baking sheet with parchment paper. Remove one disc of dough at a time from the refrigerator.
- Dust counter top, rolling pin, and top of dough with cocoa powder or flour. Roll dough out to ¼" thickness. Using a cat cookie cutter, cut dough into shapes and place onto prepared baking sheet about 1 inch apart.
- Bake cookies for about 8-9 minutes, or until cookies look set across the top. Remove from oven and allow to cool for 5 minutes on baking sheet before transferring to a cooling rack to cool completely.
Decorations
- Transfer dark chocolate melting wafers into a microwave safe bowl and microwave in 30 second increments, stirring each time, until melted and smooth.
- Using a small spatula, the back of a spoon, or a butter knife, gently coat each cookie with a thin layer of melted chocolate. If chocolate begins to thicken or dry in bowls, place back in the microwave and melt in 10 second increments.
- While chocolate is still wet, cover liberally with black sanding sugar.
- Allow chocolate to dry completely before gently brushing excess sugar off with a pastry brush.
Equipment Recommendations
Notes
- * How to measure flour properly: Use a kitchen scale to measure flour for accurate results every time. If you don't have a kitchen scale, use the spoon and level method. Stir the flour (especially if it's been packed down in a bag/container), then gently spoon into the measuring cup, leveling off the top with a knife. Scooping with a measuring cup compacts flour into the cup and adds up to 25% extra to the recipe, resulting in dry, bland cookies that don't spread properly.
- Storage: Cut out cookies will keep for 5 to 7 days in a tightly sealed container at room temperature. To help keep cookies fresh, place a slice of bread in the cookie container and replace when it dries out.
- Freezing: Cookies can be frozen for up to three months. To thaw, place on the countertop to bring to room temperature for 1 to 2 hours.
- To prevent spreading: Use parchment, not grease. Chill your dough before rolling out. Chill dough a second time on the baking sheet just before baking. Don't place dough on a hot baking sheet.

I had so much fun creating this recipe! I hope you give it a try and love it as much as I do. If you have a question, check out the post above, which is packed with information about the recipe. Tried the recipe? I'd love to hear your thoughts — leave a comment and a star rating to share your feedback!